
Desserts
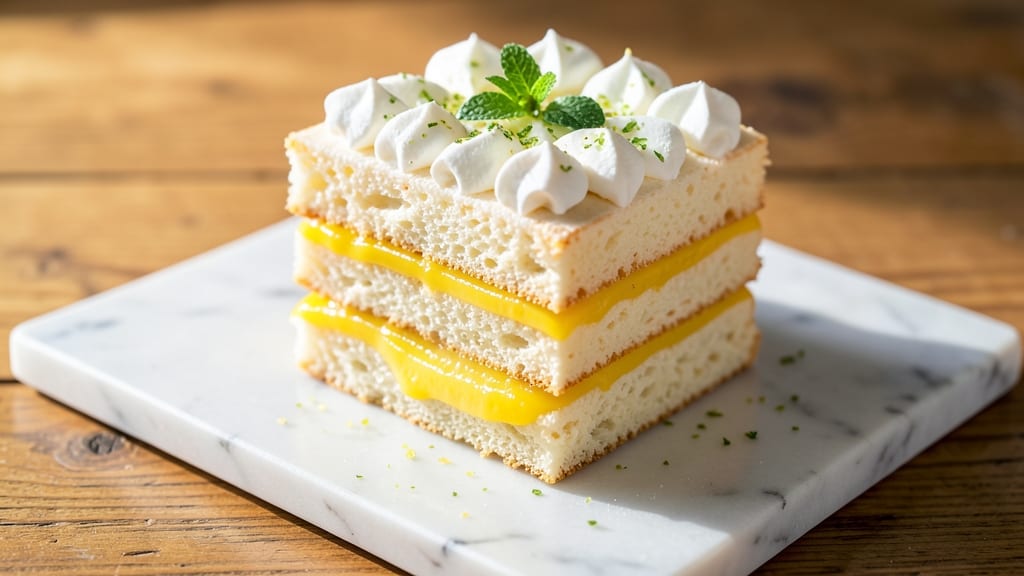
This angel food cake with lemon filling recipe delivers the perfect balance of ethereal lightness and bright citrus zing. 💛 The secret lies in properly whipped egg whites and a velvety lemon curd that transforms a simple cake into something extraordinary.
After years of perfecting the technique, I’ve created a version that’s foolproof yet still feels special—ideal for celebrations or spontaneous dessert cravings.
The cake itself is all air and delicate texture, thanks to a precise folding technique that preserves those signature air pockets. Meanwhile, the lemon filling—rich, tangy, and perfectly set—cuts through the cake’s sweetness with every bite.
What makes this recipe truly special is how the two components come together: the cake’s lightness complements the filling’s depth, creating a dessert that’s both elegant and approachable.
By the time you slice into this cake, you’ll have a dessert that’s light-as-air yet substantial, with a lemon filling that’s neither too sweet nor too tart. The cake’s tender crumb and crisp edges pair beautifully with the curd’s velvety texture, making every forkful a revelation.
This is the kind of dessert that feels like a celebration—without requiring hours in the kitchen.
Serve it with fresh berries or a dusting of powdered sugar for extra flair, or enjoy it plain to let the flavors shine. The beauty of this recipe is its versatility: it’s perfect for brunch, dinner parties, or even a simple weekend treat.
Let’s get started on creating something truly memorable.
Ingredients for angel food cake and lemon filling
Twelve ingredients transform into a dessert that's light as air with zesty lemon magic.
| Ingredient | Amount | Notes |
|---|---|---|
| Large Egg Whites 🥚 | 12 whole | Room temperature, no yolks |
| Granulated Sugar 🍚 | 1 ½ cups | Superfine preferred for smoothness |
| Cake Flour 🌾 | 1 ½ cups | Sifted, no substitutions |
| Unsalted Butter 🧈 | ½ cup | Cold, cubed for filling |
| Fresh Lemon Juice 🍋 | ½ cup | Strained, no pulp |
| Lemon Zest 🍋 | 2 tbsp | Finely grated, organic preferred |
| Heavy Cream 🥛 | ½ cup | Cold for curd stability |
| Egg Yolks 🥚 | 4 whole | Separated from whites |
| Powdered Sugar 🍚 | 1 ½ cups | For dusting and curd |
| Vanilla Extract 🌿 | 1 tsp | Pure vanilla preferred |
| Salt 🧂 | ½ tsp | Fine sea salt |
| Cornstarch 🌾 | 2 tbsp | For curd thickening |
| Fresh Berries 🍓 | 1 cup | Optional garnish (raspberries recommended) |
The egg whites are non-negotiable—room temperature is key for proper whipping. Bob's Red Mill cake flour is my go-to for angel food cakes, but any high-quality brand works. For the lemon filling, organic lemons have more vibrant zest. If you're using regular granulated sugar, pulse it in a food processor for 30 seconds to create a superfine texture—this makes all the difference in the cake's tenderness. The butter should be cold for the filling to set properly, so pull it from the fridge right before mixing.
No cake flour? All-purpose flour minus 2 tbsp per cup is the closest substitute, but it won't be as light. For the lemon filling, store-bought lemon curd works in a pinch (like Bon Appétit brand), but homemade has that restaurant-quality depth. The cornstarch can be swapped for arrowroot powder at half the amount. If you're sensitive to dairy, use coconut cream instead of heavy cream—just know the texture will be slightly softer. For the berries, frozen works fine if thawed and drained well, but fresh adds that pop of color.
The cake batter must be folded gently—use a spatula in a figure-8 motion to preserve those air pockets. Bake immediately after mixing for best results. The lemon filling should thicken as it cools, but if it's too runny after 30 minutes, whisk in another 1 tsp cornstarch mixed with water. Store the cake in an airtight container with parchment between layers for up to 3 days. The filling keeps for 5 days in the fridge or 3 months frozen. For serving, dust with powdered sugar right before cutting—it adds that professional touch.
Why You'll Love This Recipe
- No Mixer Needed: I swear by this trick—whipping egg whites with a hand mixer (or even a whisk if you're patient) gives that signature fluffy texture. No fancy equipment, just elbow grease and a steady hand. Honestly, the cake rises so effortlessly you’ll forget how little work went into it.
- Bright Tang Magic: That lemon filling? Pure sunshine in a jar. The butter and sugar melt into a silky glaze, while the fresh lemon juice cuts through the sweetness like a zesty hug. It’s the kind of flavor that makes you reach for seconds without guilt.
- Party in a Box: This cake travels like a dream—no crumbs, no mess, just layers of lightness that hold up for days. I’ve served it at brunch, picnics, even as a last-minute dessert for guests. Wrap it in foil, and it’s ready whenever you are.
- Egg Whites on Sale: Between us, egg whites are one of the cheapest ways to make something feel special. A dozen whites cost less than a fancy dessert mix, and you’ll have leftovers for days. Plus, the cake’s natural lightness means you can actually enjoy a slice without that heavy aftertaste.
Step-by-step instructions for angel food cake with lemon filling
Master this classic combination with precise techniques for a cake so light it seems defies gravity.
🍳 Step 1: Prepare the Angel Food Cake Batter
Preheat your oven to 350°F and grease a 10-inch tube pan with nonstick spray, dusting it lightly with cake flour. In a large mixing bowl, beat the 12 whole large egg whites with the 0.5 teaspoon salt on medium speed until soft peaks form. Gradually add the 1.5 cups granulated sugar, 1 tablespoon at a time, beating until the mixture is glossy and holds stiff peaks.
I like to use a stand mixer for this step—it incorporates air more efficiently than hand beaters. You'll know it's ready when the beaters leave clean trails that hold their shape for several seconds. Gently fold in the 1.5 cups sifted cake flour using a spatula, being careful not to deflate the batter. Pour the batter into the prepared pan and smooth the top with a spatula.
🔥 Step 2: Bake the Cake to Perfection
Bake the cake for 35-40 minutes or until the top springs back when gently pressed and a toothpick inserted comes out clean. Here's the thing—don't open the oven door during baking. The sudden temperature change can cause the cake to collapse. Instead, trust your timer and the visual cues.
When the cake is done, remove it from the oven and immediately invert it onto a wire rack. Let it cool completely before removing the pan. This gradual cooling prevents cracking and maintains that signature light-as-air texture. I always tap the pan gently on the counter to loosen the cake before inverting—this ensures it releases cleanly.
👨🍳 Step 3: Make the Lemon Filling
In a medium saucepan, combine the 4 whole egg yolks, 1.5 cups powdered sugar, 0.5 cup heavy cream, 0.5 cup fresh lemon juice, 2 tablespoons lemon zest, 1 teaspoon vanilla extract, and 2 tablespoons cornstarch. Whisk everything together until smooth and free of lumps.
Cook the mixture over medium heat, stirring constantly with a wooden spoon, until it thickens enough to coat the back of the spoon. This usually takes about 5-7 minutes. The filling should be thick but still pourable—not gluey. Remove from heat and let it cool completely before using to fill the cake.
🥘 Step 4: Assemble and Fill the Cake
Once the cake is completely cool and the filling has thickened, carefully slice the cake horizontally about ½ inch from the top to create a flat surface. Remove the top layer and set it aside. Use a small offset spatula to spread about ⅓ of the lemon filling evenly over the bottom layer.
Replace the top layer and gently press down to create a slight dome. Spoon the remaining filling over the top, letting it drip slightly down the sides for that classic look. The cake will hold together beautifully—the lemon filling acts like glue, binding the layers while adding that signature tangy flavor.
🍽️ Step 5: Garnish and Serve
Dust the cake generously with the remaining powdered sugar using a fine-mesh sieve. This creates that signature snowy appearance. For garnish, arrange the 1 cup fresh berries (raspberries work best) around the base of the cake or on top for a pop of color and freshness.
Slice with a serrated knife that's been dipped in hot water and wiped dry—this ensures clean cuts through the delicate cake layers. Serve immediately for the best texture, but you can refrigerate for up to 2 hours if needed. The contrast of the light, airy cake with the rich, tangy lemon filling is what makes this dessert truly special.
Pro Tips For Making Angel Food Cake And Lemon Filling
- Whip Egg Whites Cold: Pop those egg whites straight from the fridge—room temperature makes them clingy and hard to fold. I learned this the hard way when my cake collapsed like a sad soufflé; now I swear by the cold start for that light, airy texture.
- Sift Flour Twice: Angel food cake is all about the air, so don’t skimp on sifting that cake flour. Do it once before mixing, then sift it again right into the bowl—this cuts lumps and keeps the batter silky smooth. (Yes, it’s extra work, but your cake will rise like a dream.)
- Stop Baking Early: The cake will keep cooking after you pull it out—so take it out when the top springs back just slightly, not when it’s fully set. I used to overbake and end up with a dry, rubbery mess; now I let it finish cooling in the pan, and the center stays tender.
- Strain Lemon Juice: No one wants gritty lemon filling. Strain the fresh juice through a fine-mesh sieve to catch seeds and pulp—it’s a 30-second step that makes a real difference. (Bonus: Use the strained pulp in a quick compote if you’re feeling fancy.)
Pro cooking tips for great angel food cake and lemon filling
Egg White Mastery
Room temperature egg whites are non-negotiable for proper volume. I recommend separating them 24 hours ahead and storing in the fridge—this helps them reach the perfect 65°F temperature. Use a fine-mesh sieve to remove any stray yolks, as even a trace can prevent stiff peaks.
For best results, whip them in a copper bowl (like All-Clad)—it creates a natural reaction that stabilizes the foam better than stainless steel.
When adding sugar, do it gradually—1 tablespoon at a time—to maintain air incorporation. I like to use a hand mixer with a whisk attachment for the first stage, then switch to a stand mixer for the final stiff peaks.
Stop mixing as soon as you see dry, crumbly strands forming around the beaters—that's your signal the whites are perfectly whipped.
Temperature Control
Preheat your oven to 350°F and keep it there—don't let it drop below 340°F during baking. I use an oven thermometer to verify accuracy, as home ovens often run hot or cold.
Place a tray of water on the lower rack to create steam, which helps the cake rise evenly and prevents a dry top crust.
The cake must cool completely before removing from the pan—at least 2 hours at room temperature. I place it on a wire rack over a baking sheet to catch any crumbs.
Never rush this step, as premature removal can cause collapse. For extra insurance, run a thin knife around the edges of the pan before inverting to loosen the cake cleanly.
Lemon Filling Secrets
Strain your lemon juice through a fine-mesh sieve to remove any pulp, which can make the filling grainy. For maximum brightness, use organic lemons—they have more vibrant flavor. When cooking the filling, maintain medium heat and stir constantly to prevent curdling.
If you see any lumps forming, immediately whisk in 1 teaspoon cold water to smooth it out.
The filling should coat the back of a spoon but still be pourable—think pudding consistency. Let it cool completely before assembling the cake, as warm filling can melt the butter in the cake layers.
For extra stability, chill the assembled cake in the fridge for 30 minutes before serving to help the filling set properly.
Assembly Precision
Use a serrated knife to slice the cake horizontally—½ inch from the top creates the perfect flat surface. I recommend using a long, thin offset spatula to spread the filling evenly.
Apply gentle pressure when replacing the top layer to create a slight dome, which gives the cake its classic shape and helps it hold together.
For that professional finish, dust with powdered sugar using a fine-mesh sieve rather than a shaker—it creates an even, snowy effect. Serve immediately for the best texture, but if you need to refrigerate, do so for no more than 2 hours to prevent the cake from becoming soggy.
The contrast of the light cake and rich filling is what makes this dessert truly special.
Nutrition facts
Frequently asked questions
Can I make this cake without egg whites?
Traditional angel food cake relies on egg whites for its signature lightness, but you can try a substitution. For a vegan version, use 1 cup aquafaba (chickpea brine) whipped with 1 teaspoon cream of tartar and 1 teaspoon xanthan gum to mimic the structure. However, the texture won't be identical—expect a slightly denser crumb. For gluten-free, ensure your cake flour is certified GF.
How do I fix a sunken angel food cake?
If your cake sinks, it's usually due to overmixing or opening the oven door too soon. For a quick fix, slice off the top ½ inch and replace it with a thin layer of lemon curd. Chill for 1 hour to set, then dust with powdered sugar. For prevention, bake at 350°F with a water tray on the lower rack and avoid opening the oven during baking.
Can I bake the cake ahead of time?
Yes! Bake the cake layers 1 day ahead and store them wrapped in plastic at room temperature. Assemble with the lemon filling just before serving. The filling can be made 2 days ahead and refrigerated. For best texture, serve within 2 hours of assembling—this prevents the cake from becoming soggy.
Why did my lemon filling turn grainy?
Grainy filling usually means unstrained lemon juice or overheating. Always strain your juice through a fine-mesh sieve to remove pulp. Keep heat at medium-low and stir constantly. If lumps form, whisk in 1 teaspoon cold water to dissolve them. For extra smoothness, blend the cooled filling briefly before using.
What's the best way to store leftovers?
Store the cake in an airtight container with parchment between layers for up to 3 days at room temperature. The lemon filling keeps for 5 days refrigerated or 3 months frozen. For longer storage, freeze the assembled cake (without powdered sugar) for up to 1 month. Thaw overnight in the fridge before serving.