
Desserts
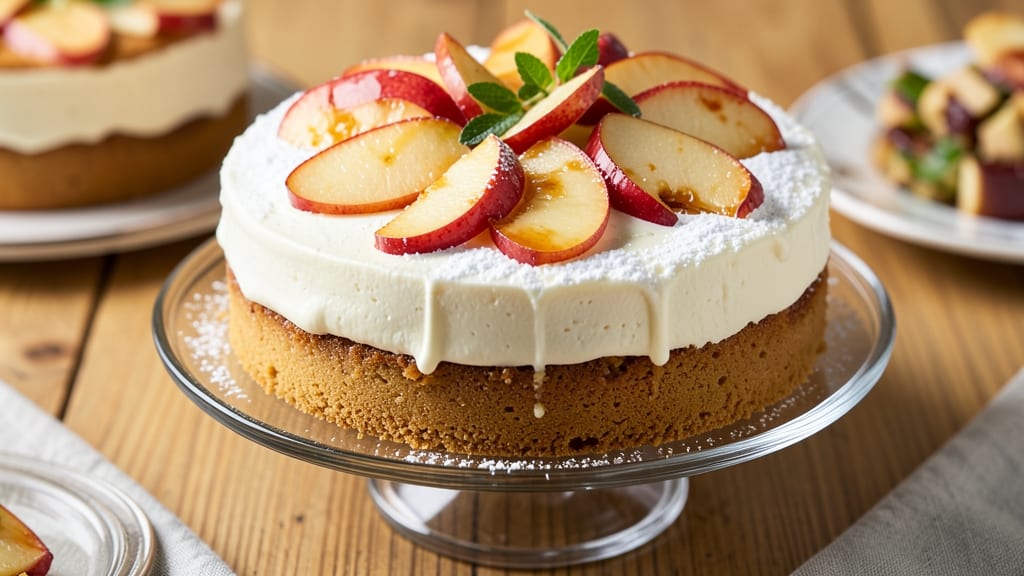
This apple cream cake recipe delivers the perfect balance of tender vanilla cake, spiced apple filling, and a buttery crumb topping that feels like a hug in dessert form. The secret lies in layering thin apple slices between moist cake batter, creating bite-sized pockets of sweet-tart flavor with every slice. I've perfected this recipe over years of baking—it's the kind that disappears faster than you can say "second helping."
The cake itself is a foolproof vanilla sponge, baked just until golden, while the apple filling gets its depth from cinnamon, nutmeg, and a touch of brown sugar. The buttery crumb topping adds a satisfying crunch that contrasts beautifully with the soft layers below.
What makes this recipe special is how it combines classic techniques with modern convenience—no fancy equipment needed, just a few simple steps to create a showstopper dessert.
By the time you pull it from the oven, you'll have a cake with layers of vanilla-infused cake, tender apple slices, and a golden crumb topping that smells like autumn. The texture is what truly sets it apart—moist cake, jammy apples, and crispy crumbs all working together in perfect harmony.
Serve it warm with vanilla ice cream or a dollop of whipped cream for the ultimate comfort dessert.
This recipe is versatile enough for holidays or weeknight treats, and I'll share tips for variations like caramel glaze or spiced apples. Let's get baking!
Ingredients for apple cream cake
Sweet vanilla cake layers, jammy apple slices, and buttery crumb topping—this is comfort in every bite.
| Ingredient | Amount | Notes |
|---|---|---|
| All-Purpose Flour 🌾 | 2 ½ cups | Sifted for light texture |
| Granulated Sugar 🍚 | 1 ½ cups | White or light brown |
| Unsalted Butter 🧈 | 1 cup | Cold and cubed for cake |
| Large Eggs 🥚 | 2 whole | Room temperature preferred |
| Vanilla Extract 🌿 | 2 tsp | Pure vanilla preferred |
| Baking Powder 🧂 | 2 tsp | Aluminum-free preferred |
| Salt 🧂 | ½ tsp | Fine sea salt |
| Apples 🍎 | 4 medium | Sweet-tart variety like Honeycrisp |
| Brown Sugar 🍚 | ½ cup | Packed for filling |
| Ground Cinnamon 🌶️ | 1 ½ tsp | Freshly ground preferred |
| Ground Nutmeg 🌿 | ¼ tsp | Freshly grated nutmeg |
| Old-Fashioned Oats 🥣 | 1 cup | Blended into crumbs |
| Chopped Walnuts 🌰 | ½ cup | Toasted for crumb topping |
| Powdered Sugar 🍚 | ¼ cup | For dusting crumb topping |
| Heavy Cream 🥛 | ½ cup | For filling between layers |
The apples are everything here. Honeycrisp or Fuji work best—sweet enough to caramelize but still hold their shape. Core them, slice them paper-thin (a mandoline makes this easy), and toss with a little lemon juice so they don’t brown. Trader Joe’s has pre-sliced apples in the produce section if you’re short on time. For the cake, King Arthur flour gives the best texture, but any all-purpose will do. The butter? Plugrá or Land O’Lakes are my go-tos—just make sure it’s cold when you cube it for the cake batter.
No vanilla extract? Seeds from a vanilla bean steeped in warm water work perfectly. Short on brown sugar? White sugar plus 1 tsp molasses mimics the flavor. The crumb topping can be made ahead—just store it in the fridge and bake straight from cold. Want extra crunch? Add 1 tbsp extra oats. For the filling, if you’re feeling fancy, swap the heavy cream for whipped mascarpone mixed with powdered sugar. And if you’re making this ahead, bake the cake layers 1 day in advance—they’ll be even moister.
The cake layers keep 3 days wrapped at room temp, but honestly, they’re best fresh. The crumb topping? Make it the night before and store in the fridge—it’ll be even more flavorful. Assemble the cake 4 hours before serving so the filling can soak in. For leftovers, wrap each slice in parchment and store in an airtight container. Freezes beautifully for 2 months—just thaw at room temp before serving. Pro tip: Dust with powdered sugar right after baking for that bakery-fresh look.
Why You'll Love This Recipe
- No Mixer Needed: I swear by this recipe when my stand mixer’s broken (again). Creaming the butter and sugar by hand takes five minutes—no fancy equipment, just elbow grease. The eggs and vanilla blend right in, and the flour comes together like a dream.
- Spiced Apple Magic: That buttery crumb with tender apples? It’s like autumn in a box. The sugar caramelizes just enough to make every bite taste like a bakery slice, but the cream cheese layer keeps it from being too heavy. Honestly, I’ve never met a cake that balances sweet and tangy this well.
- Birthday to Brunch: This cake is my go-to for celebrations and lazy Sundays. Frost it with whipped cream for a party dessert, or slice it cold for a no-fuss breakfast. My college-aged nephew even asked for seconds at 11 AM—high praise.
- Leftovers That Win: Bake one, eat two. The texture stays moist for days, and the apples don’t turn mushy. I’ve packed it in lunches, reheated slices for dinner, and even turned extra into apple cream cheese muffins. Budget-friendly? Absolutely. Reliable? You bet.
Step-by-step instructions for apple cream cake
This vanilla-infused cake delivers perfect layers with a buttery crunch topping—every bite is pure comfort.
👨🍳 Step 1: Prep the Apples and Crumb Topping
Peel, core, and finely dice the 4 medium apples into small, even pieces—about ¼-inch cubes. Toss them with 0.5 cup brown sugar, 1.5 tsp ground cinnamon, and 0.25 tsp ground nutmeg in a bowl. This sweet-spiced mix will infuse the cake layers with warm apple flavor.
For the crumb topping, pulse 1 cup old-fashioned oats and 0.5 cup chopped walnuts in a food processor until you get coarse crumbs. Transfer to a bowl and mix in 0.25 cup powdered sugar. This buttery crunch topping is the star—don’t skip blending the oats finely for that perfect texture.
🍳 Step 2: Bake the Vanilla Cake Layers
Preheat your oven to 350°F and grease two 8-inch round cake pans. In a large bowl, cream together 1 cup unsalted butter and 1.5 cups granulated sugar until light and fluffy—about 3-4 minutes. Add the 2 whole eggs, one at a time, mixing well after each. Stir in 2 tsp vanilla extract until fully combined.
In a separate bowl, whisk together 2.5 cups all-purpose flour, 2 tsp baking powder, and 0.5 tsp salt. Gradually fold the dry ingredients into the butter mixture until just combined—don’t overmix. Divide the batter evenly between the prepared pans and bake for 25-30 minutes, or until a toothpick inserted comes out clean. Let the layers cool completely before assembling.
🥘 Step 3: Assemble the Cake Layers
Once the cake layers are fully cooled, spread a thin layer of 0.5 cup heavy cream between them. This step is crucial—it keeps the cake moist and adds that signature creaminess. Be gentle when spreading to avoid tearing the delicate layers.
Place the first cake layer on a serving plate and spread the spiced apple mixture evenly over the top. Repeat with the second layer, then add the remaining apples. The filling should be generous but not overflowing—this ensures every slice has that perfect apple-cream balance.
🔥 Step 4: Add the Crunch Topping and Bake
Mix the crumb topping with 1 cup unsalted butter, melted, until fully coated. Sprinkle this mixture evenly over the top of the cake, pressing down gently to adhere. Bake at 350°F for 15-20 minutes, until the topping is golden brown and crisp. Watch closely—it’s easy to overbake and turn it too dark.
Let the cake cool completely before slicing. The contrast of the warm spiced apples, creamy filling, and buttery crunch topping makes this cake unforgettable. Serve with a dollop of whipped cream or a scoop of vanilla ice cream for the ultimate dessert experience.
Pro Tips For Making Apple Cream Cake
- Cream the Butter Slowly: Don’t dump cold butter straight into sugar—let it warm slightly in your hands first. I learned this the hard way when my first batch turned out grainy; warm butter blends smoother and cuts less, giving you that silky texture the cake deserves.
- Whisk Eggs Until Ribbon-Stage: Beat those eggs until they hold a ribbon when the whisk is lifted—no streaks, no lumps. Overmixed? You’ll get a tough cake. Under? A dense one. This is the thing that matters most for that light, airy crumb.
- Sift the Flour Twice: Skip the sifting? You’re asking for tunnels. Use a fine-mesh sieve and do it twice—once before mixing, once after—especially if your flour’s been sitting in a hot pantry. Less gluten, more even texture.
- Chill the Batter 30 Minutes: Sounds weird, but it works: refrigerate the batter before baking. The butter won’t melt too fast, and your cake rises more evenly. I was skeptical until I tried it—no more domed tops or raw centers.
Essential equipment for this dish
Essential Mixing Tools
For this apple cream cake, a stand mixer with a paddle attachment is my go-to for creaming butter and sugar—it saves time and ensures a light, fluffy texture. If you don’t have one, use hand mixers or a sturdy wooden spoon, but be prepared for extra elbow grease.
A medium-sized mixing bowl (at least 5-quart capacity) keeps ingredients contained while you cream and fold. I love the OXO Good Grips bowls—they’re sturdy and easy to clean. 🥄
Baking Pans
Two 8-inch round cake pans with removable bottoms are non-negotiable for even baking. I prefer Wilton Perfect Results pans—they’re affordable and bake consistently. Grease them thoroughly with butter or baking spray (like Baker’s Joy) to prevent sticking.
For extra insurance, line the bottoms with parchment paper circles cut to fit. Pro tip: Chill your pans in the fridge for 15 minutes before baking to help the edges rise evenly. 🧁
Apple Prep Gear
A mandoline slicer is a game-changer for uniform apple slices—just set it to ¼-inch thickness and work quickly to prevent browning. If you don’t have one, a sharp chef’s knife and a cutting board will do, but expect uneven slices.
Toss your apples with lemon juice (about 1 tbsp) right after slicing to keep them bright. A fine-mesh sieve helps drain excess juice if you’re making a compote-style filling. 🍎
Crumb Topping Tools
For the crumb topping, a food processor is ideal for blending oats and nuts into fine crumbs. The Ninja BN601 is my budget-friendly favorite—it’s powerful and easy to clean. If you’re blending by hand, a mortar and pestle works, but it’s time-consuming.
A small mixing bowl (like Pyrex) keeps ingredients contained while you combine with melted butter. A spatula helps spread the topping evenly over the cake. 🥣
Assembly Essentials
Assembly requires a long, flexible offset spatula (like OXO Good Grips) for spreading cream and apple filling without tearing layers. A bench scraper helps divide cake batter evenly between pans.
For serving, a serrated knife with a sawing motion gives clean slices. Don’t forget a cooling rack—it’s crucial for even cooling and preventing soggy bottoms. 🔪
Optional Extras
For a caramel glaze, you’ll need a small saucepan and a whisk to combine ½ cup caramel sauce with 1 tbsp heavy cream. A piping bag (with a star tip) makes elegant decorations for the top.
If you’re adding fresh fruit garnishes, a pair of kitchen shears trims herbs neatly. And for presentation, a round cake stand elevates your dessert like a pro. ✨
Nutrition facts
Frequently asked questions
Can I make this apple cream cake without a stand mixer?
While a stand mixer makes creaming butter and sugar easier, you can achieve the same results with a hand mixer or even a sturdy wooden spoon. Just be prepared to mix for an extra 2-3 minutes to get that light, fluffy texture. The key is patience—don't rush the process!
How do I prevent the cake layers from becoming soggy?
Let the cake layers cool completely before assembling to avoid sogginess. Also, use a thin layer of heavy cream between layers—don't overdo it. For extra insurance, chill the assembled cake in the fridge for 1 hour before baking the crumb topping. This helps everything set properly.
What's the best way to store leftovers?
Wrap individual slices in plastic wrap and store them in an airtight container at room temperature for up to 3 days. For longer storage, freeze the whole cake (unfrosted) for up to 2 months. Thaw overnight in the fridge before serving. The crumb topping stays crispy even when frozen!
Can I substitute the apples with something else?
While apples are ideal, you can try peaches or pears for a similar texture. For a tropical twist, use pineapple or mango, but reduce the sugar in the filling by 25%. Just remember—tart fruits like apples hold up better during baking.
Why did my crumb topping turn out crumbly instead of crispy?
Over-processing the oats or using too much powdered sugar can make the topping crumbly. For crispiness, blend the oats just until coarse (not powdery) and use 1 cup melted butter for the full batch. Also, bake the topping until golden brown—don't underbake!