
Desserts
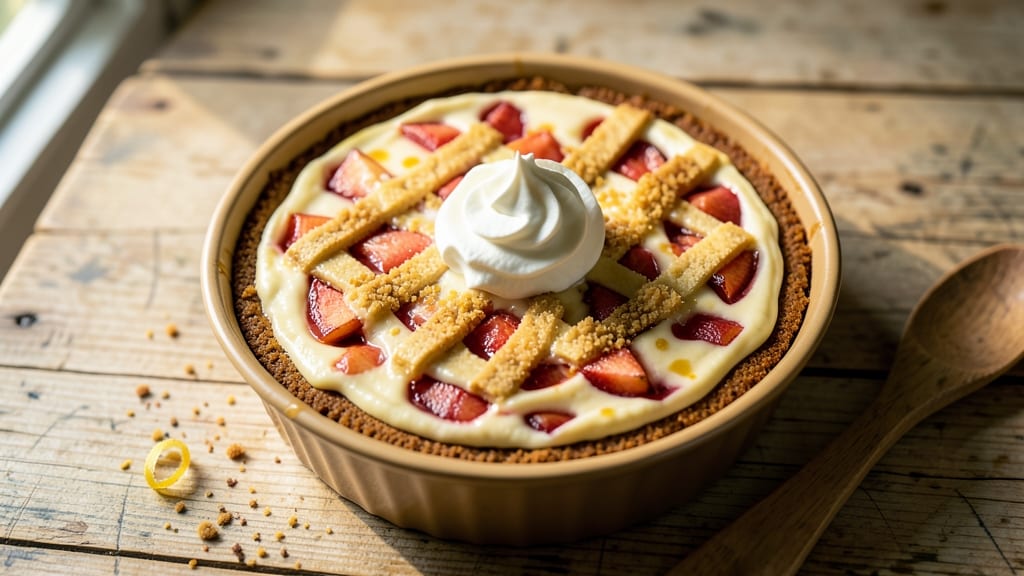
This apple pie filling cheesecake recipe reimagines two American classics into one rich, layered dessert that delivers the perfect balance of creamy cheesecake and spiced apple filling.
The secret lies in baking a sturdy graham cracker crust, setting a smooth cheesecake layer, and topping it with a warm, caramelized apple filling that creates a textural and flavorful contrast every bite.
I developed this recipe after testing countless variations to ensure the apple filling stays thick and flavorful while the cheesecake remains velvety and perfectly set.
The beauty of this hybrid dessert is its versatility—it works as an impressive showstopper for holidays or a comforting treat for any occasion. The cheesecake base provides the familiar tangy richness we love, while the apple filling adds a warm, spiced sweetness that feels like autumn in every slice.
What makes this recipe stand out is the technique of baking the apple filling separately and assembling it just before serving, ensuring it stays gooey and aromatic without becoming soggy.
By the time you're done, you'll have a dessert that looks as stunning as it tastes—golden caramelized apples peeking through a creamy cheesecake layer, all resting on a buttery graham cracker crust. The combination of textures—smooth, creamy, and slightly crisp—makes this dessert unforgettable.
Whether you're serving it at a dinner party or enjoying a slice with a scoop of vanilla ice cream, this recipe is sure to impress.
Ready to bake? The process is straightforward but requires patience—especially when it comes to letting the cheesecake set properly. With just a few key techniques, you'll achieve restaurant-quality results that taste even better than the sum of their parts. Let's get started!
Ingredients for apple pie filling cheesecake
These carefully selected ingredients create a dessert where creamy cheesecake meets spiced apple perfection.
| Ingredient | Amount | Notes |
|---|---|---|
| Graham Cracker Crumbs 🍪 | 2 cups | Finely crushed, buttery preferred |
| Unsalted Butter 🧈 | ¾ cup | Cold, cubed for crust |
| Granulated Sugar 🍚 | ½ cup | For crust sweetness |
| Large Eggs 🥚 | 3 whole | Room temperature |
| Cream Cheese (Full-Fat) 🧀 | 24 oz | Room temperature, block preferred |
| Sour Cream 🥛 | ½ cup | Full-fat for richness |
| Vanilla Extract 🌿 | 1 tbsp | Pure, high-quality |
| Ground Cinnamon 🌶️ | 1 tbsp | Freshly ground preferred |
| Granulated White Sugar 🍚 | 1 ½ cups | For cheesecake layer |
| Red Delicious Apples 🍎 | 4 medium | Peeled, cored, sliced |
| Brown Sugar 🍚 | ½ cup | Packed, for apple filling |
| Lemon Juice 🍋 | 2 tbsp | Freshly squeezed |
| Ground Nutmeg 🌶️ | ¼ tsp | Freshly grated preferred |
| All-Purpose Flour 🌾 | ¼ cup | For thickening apple filling |
| Salt 🧂 | ½ tsp | Fine sea salt |
The graham cracker crust sets the foundation, so Honey Maid or Keebler graham crackers are ideal—they're sturdy enough to hold the filling without crumbling. For the cream cheese, Philadelphia brand is a standard for its consistent quality, but any full-fat block works if you grate it yourself. The apples should be firm and free of bruises—Red Delicious or Honeycrisp hold their shape best during baking. Pre-slicing them ensures even cooking, and peeling prevents bitterness. When shopping, look for apples with vibrant color and a slight give when pressed; these indicate ripeness without being overripe.
No vanilla extract? Vanilla bean paste or even a scraped vanilla bean work beautifully for depth. Running short on brown sugar? Lightly caramelized white sugar (cook 0.5 cup white sugar + 1 tbsp water until amber) mimics its molasses notes. For the cheesecake layer, sour cream adds moisture and tang, but Greek yogurt in a pinch provides similar texture. The apple filling can be made ahead and reheated gently—just add a splash of water or apple juice if it thickens too much during storage. If your flour is old, toast it briefly in a dry pan to revive its thickening power.
Store the assembled cheesecake in an airtight container in the refrigerator for up to 5 days, though it's best enjoyed within 3 days for optimal texture. The apple filling can be prepped and refrigerated separately for 2 days before assembly. For longer storage, freeze the unbaked cheesecake (before adding the apple topping) for up to 2 months
Why You'll Love This Recipe
- No-Bake Magic: I swear by this recipe when I’m too tired to bake. Just mix the cream cheese and sugar, fold in that spiced apple pie filling—no oven, no waiting, no stress. The graham cracker crust handles the mess while you’re still scraping the bowl.
- Creamy-Meets-Fruity Bliss: That first bite? It’s like biting into a warm apple pie, but with the cool, velvety richness of cheesecake. The sugar in the filling caramelizes just enough to make it taste homemade, even though it’s store-bought shortcut.
- Party in a Bowl: Honestly, this is my go-to for potlucks, holidays, or when I need dessert that actually impresses. Serve it chilled with a scoop of vanilla ice cream—suddenly, you’re the hero of the gathering. (Yes, even on a Tuesday night.)
- Leftovers That Don’t Suck: Between us, most cheesecakes turn to sad rubber the next day. Not this one. The cream cheese keeps it luscious, and the apple filling stays vibrant. I’ve had this for breakfast (yes, really) and it’s still delicious—proof it’s a recipe that works for any day.
Step-by-step instructions for apple pie filling cheesecake
This hybrid dessert combines the creamy richness of cheesecake with the comforting spice of apple pie filling.
Prepare the Graham Cracker Crust
Preheat your oven to 350°F and grease a 9-inch springform pan generously with butter. In a medium bowl, combine the 2 cups graham cracker crumbs with the 0.75 cup unsalted butter and 0.5 cup granulated sugar. Use your fingers to work the mixture until it resembles wet sand and all crumbs are evenly moistened.
Press the crumb mixture firmly and evenly into the bottom of the prepared pan, creating an even layer. Use the back of a measuring cup to compact it tightly—this prevents crumbling during baking. Bake for 10 minutes until lightly golden. Remove from the oven and let cool while you prepare the filling.
Make the Apple Filling
Peel, core, and slice the 4 medium red delicious apples into ¼-inch thick slices. In a large skillet over medium heat, combine the apples with the 0.5 cup brown sugar, 1 tbsp ground cinnamon, 0.25 tsp ground nutmeg, and 0.5 tsp salt. Cook for 8-10 minutes, stirring occasionally, until the apples soften and release their juices.
Remove from heat and stir in the 2 tbsp lemon juice and 0.25 cup all-purpose flour. The mixture should thicken slightly as it cools. Set aside to let the flavors meld while you prepare the cheesecake layer.
Prepare the Cheesecake Layer
In a large mixing bowl, beat the 24 oz cream cheese (full-fat) and 1.5 cups granulated white sugar on medium speed until smooth and creamy, about 3 minutes. Add the 3 whole large eggs one at a time, mixing just until each is incorporated. Scrape down the sides of the bowl as needed.
Incorporate the 0.5 cup sour cream, 1 tbsp vanilla extract, and mix until fully combined. The batter should be thick but pourable. Pour half of this mixture over the cooled crust in the springform pan, spreading it evenly. Top with the apple filling, then pour the remaining cheesecake batter over the apples.
Bake to Golden Perfection
Return the pan to the preheated 350°F oven and bake for 50-55 minutes until the edges are set and the center is just slightly jiggly. The top should be golden brown with a few cracks—this indicates proper baking. Avoid overbaking, as the center will continue to set as it cools.
Remove from the oven and let cool completely at room temperature for 1 hour. Then refrigerate for at least 4 hours or overnight to allow the layers to fully set. This chilling time is crucial for achieving the perfect texture—creamy cheesecake with a thickened apple filling.
Serve and Enjoy
Run a knife around the edge of the springform pan to loosen the cheesecake. Release the sides and remove the ring. Serve chilled slices with a dollop of whipped cream or caramel drizzle if desired. Each slice should reveal the beautiful contrast of creamy cheesecake, spiced apple filling, and buttery crust in every bite.
The combination of warm spices from the apple layer and the cool, rich cheesecake creates a perfect balance of textures and flavors. Store leftovers covered in the refrigerator for up to 3 days, though I doubt any will last that long!
Pro Tips For Making Apple Pie Filling Cheesecake
- Mix Cream Cheese Slowly: I learned this the hard way—dumping cold cream cheese into warm butter or sugar makes it seize up like glue. Instead, cut it into small cubes first, then mix in the butter and sugar at low speed until just combined. You’re not making ice cream here; keep it cool.
- Toast Graham Crackers First: Skip the pre-packaged crumbs if you can—crush graham crackers fresh and toast them lightly in a dry pan for 2-3 minutes. The extra crunch and nutty depth make the crust sing, and it won’t turn to mush when the filling bakes. (Yes, even if you’re impatient like me.)
- Use Room-Temp Eggs: Cold eggs? Big mistake. Whip them at room temperature for a smoother batter and fewer air pockets. Pop them in a bowl of warm water for 10 minutes—this isn’t rocket science, but it guarantees a lighter, more uniform texture. Your future self will notice the difference.
- Bake Low and Long: This isn’t a 350°F cake—treat it like a delicate custard. Bake at 325°F for 50-60 minutes, then turn off the oven and let it sit for another 30 minutes. The center will set properly without cracking, and the apple filling won’t turn to syrup. Sounds weird, but it works.
Essential equipment for perfect results
Springform Pan
A 9-inch springform pan is essential for this recipe—it allows you to release the sides cleanly after baking, giving you that perfect restaurant-style presentation. I recommend a high-quality pan with a sturdy locking mechanism like the Nordic Ware Natural Aluminum or USA Pan.
These pans distribute heat evenly and prevent warping, which is crucial for a smooth cheesecake layer. If you don’t have one, a standard oven-safe pan with removable sides works too, but the springform makes slicing and serving much easier. 🧈
Mixer Attachment
For the cheesecake layer, a hand mixer with a paddle attachment is a game-changer. I use my KitchenAid Stand Mixer with the flat beater to cream the butter and cream cheese until perfectly smooth—this ensures no lumps in the final texture.
If you don’t have a stand mixer, a handheld mixer works just as well, but be prepared to mix for a few extra minutes to reach the same consistency. Avoid whisk attachments, as they incorporate too much air and can cause cracks in the cheesecake. 💫
Measuring Tools
Precision is key when baking, so invest in a digital kitchen scale and a set of stainless steel measuring cups and spoons. For the apple filling, accurate measurements of brown sugar and flour are critical to achieving the right balance of sweetness and thickness.
I swear by the OXO Good Grips measuring tools—they’re durable and make measuring a breeze. For the cheesecake layer, a fine-mesh tamper helps press down the batter evenly, preventing air pockets. 📏
Skillet for Apples
A heavy-bottomed stainless steel skillet (like the All-Clad Stainless) is ideal for cooking the apple filling because it distributes heat evenly and prevents burning. If you don’t have one, a cast iron skillet works too—just be sure to preheat it properly to avoid sticking.
Avoid non-stick pans for this step, as they can’t handle the high heat needed to caramelize the apples properly. A wooden spoon is perfect for stirring and ensuring the apples cook evenly without breaking apart. 🍎
Offset Spatula
An offset spatula is your best friend for spreading the cheesecake batter evenly over the crust and apple filling. I use a 6-inch stainless steel offset spatula to create a smooth, even layer—this prevents lumps and ensures the filling is distributed perfectly.
It’s also helpful for scraping down the sides of the bowl while mixing the batter to keep everything uniform. A good-quality spatula, like the Mercer Culinary Genesis, makes all the difference in achieving a professional finish. 🔥
Knife for Slicing
For serving, a sharp chef’s knife or a serrated knife is essential for clean, precise slices. I recommend a Wüsthof Classic or Victorinox Fibrox—both are durable and stay sharp longer. Run the knife around the edge of the springform pan before releasing the sides to ensure clean cuts.
If you’re serving guests, a pie server (a small, round knife with a handle) makes slicing even easier and more controlled. 🍰
Nutrition facts
Frequently asked questions
Can I make this dessert ahead of time?
The cheesecake layer can be baked and refrigerated for up to 3 days before adding the apple filling. For best results, assemble the dessert 4-6 hours before serving to let the flavors meld. The apple filling can be prepped and stored separately for 2 days in the fridge—just reheat gently before layering.
Why does my apple filling get watery?
Overcooking the apples releases too much liquid, while undercooking leaves them too firm. Aim for 8-10 minutes on medium heat until tender but still holding shape. The flour helps thicken, but if it's still runny, simmer uncovered for 2-3 extra minutes to evaporate excess moisture. Chilling also helps it set properly.
Can I substitute the graham cracker crust?
Yes! For a gluten-free option, use 1.5 cups almond flour mixed with 0.5 cup melted butter and 0.25 cup sugar. For a nut-free version, try a crushed Digestive Biscoff or Oreos crust. Just press it firmly to prevent crumbling. The crust should be sturdy enough to hold the creamy layers without breaking.
How do I prevent cracks in the cheesecake?
Cracks happen when the cheesecake bakes too quickly or cools unevenly. Avoid opening the oven door during baking, and let it cool completely at room temperature for 1 hour before refrigerating. Also, ensure your cream cheese is fully room temperature—no cold lumps! For extra insurance, bake in a water bath (place the springform pan in a larger pan with hot water halfway up the sides).
What's the best way to serve this dessert?
Serve chilled slices with a dollop of whipped cream, a drizzle of caramel sauce, or a scoop of vanilla ice cream to enhance the apple-cheesecake contrast. For a festive touch, garnish with toasted pecans or a sprinkle of cinnamon. The warm spices in the apple filling pair beautifully with cool, creamy textures—perfect for holiday gatherings!