
Desserts
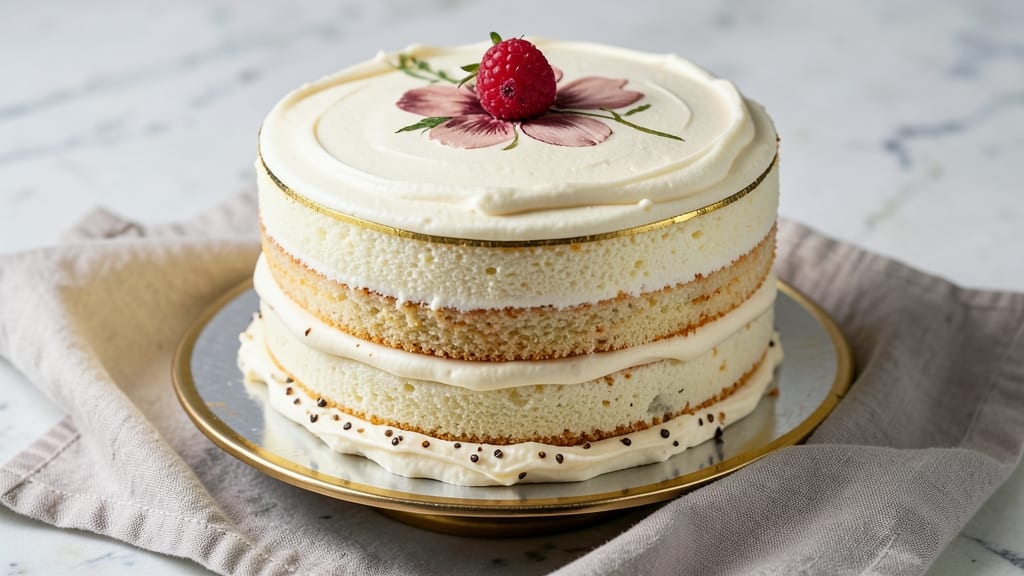
This American vanilla cake recipe delivers the ultra-moist, tender layers that make it a classic dessert staple. The secret lies in a combination of buttermilk and vanilla bean paste that creates rich flavor and perfect texture.
I've perfected this recipe over years of baking, ensuring every slice stays moist for days.
The foundation of this cake is simple yet effective: all-purpose flour, granulated sugar, and eggs create the structure, while buttermilk adds moisture and tanginess. What sets it apart is the vanilla bean paste—it infuses deep vanilla flavor without the bitterness of extract.
The cake bakes up with a golden crust and a tender, slightly crumbly interior that holds up beautifully.
What you'll achieve is a cake that's perfectly balanced—sweet but not overpowering, moist without being dense. The layers separate cleanly for frosting, and the vanilla flavor shines through in every bite. This is the kind of cake that tastes like home baking, with a professional finish.
Whether you're serving it at a family gathering or enjoying a slice with afternoon tea, this recipe delivers consistent results. The instructions are straightforward, and the ingredients are easy to find. Let's get started on creating your perfect vanilla cake.
Ingredients for american vanilla cake
Nine essential ingredients transform into the perfect American vanilla cake with tender layers.
| Ingredient | Amount | Notes |
|---|---|---|
| All-Purpose Flour 🌾 | 2 ½ cups | Sifted for light texture |
| Granulated Sugar 🍚 | 2 cups | Superfine preferred for smoothness |
| Vanilla Bean Paste 🌿 | 2 tbsp | High quality for rich flavor |
| Large Eggs 🥚 | 4 whole | Room temperature for even mixing |
| Unsalted Butter 🧈 | 1 cup | Cold, cubed for proper creaming |
| Buttermilk 🥛 | 1 ½ cups | Fresh for optimal tanginess |
| Baking Powder 🧂 | 2 tsp | Aluminum-free preferred |
| Salt 🧂 | ½ tsp | Fine sea salt for balance |
| Vanilla Extract 🍯 | 1 tsp | Pure for complementary flavor |
The vanilla bean paste is non-negotiable here—it delivers that authentic vanilla depth that extract can't match. Nielsen-Massey or Madagascar vanilla from specialty stores is ideal, but even a good-quality paste from Williams Sonoma works beautifully. For the butter, Land O'Lakes unsalted is my go-to, but any good-quality brand will do. The buttermilk? Cultivate brand is my favorite for its tang, but if you're in a pinch, mix powdered buttermilk with water. Just don't skip it—the moisture and tang are what make this cake truly special.
No vanilla bean paste? Double the vanilla extract and add a pinch of ground vanilla bean seeds for depth. Short on buttermilk? Mix 1.5 tbsp vinegar or lemon juice with 1.5 cups milk—it works in a bind. For the flour, King Arthur all-purpose is my recommendation, but any good-quality flour will do. The baking powder should be fresh—if it's more than six months old, test it first. And if you're worried about the cake being too sweet, reduce sugar slightly and boost the vanilla flavor instead.
Store the dry ingredients in airtight containers for up to 6 months, and the butter in the fridge for 3 months. Once mixed, the batter can sit at room temperature for up to 24 hours before baking—great for meal prep. The finished cake keeps well for 4-5 days at room temperature, wrapped tightly. For longer storage, freeze slices wrapped in plastic for up to 3 months. Always bring to room temperature before serving for the best texture.
Why You'll Love This Recipe
- Pantry Staples Only: I swear by this recipe because it uses things I always have—flour, sugar, butter, eggs—no fancy ingredients or last-minute grocery runs. The vanilla bean paste? That’s the only splurge, and honestly, it’s the secret to that rich, professional-tasting flavor without the hassle of scraping seeds.
- Buttercream Ready: Between us, the real magic happens when you fold in that vanilla bean paste into the buttercream. The swirl of real vanilla flavor? It’s not just good—it’s dangerously good, and I’ve been known to eat cake straight from the bowl. (Don’t judge.)
- Birthday to Brunch: This cake is my go-to for birthdays, but it’s also the star of my lazy Sunday brunch when I’m too tired to bake anything fancy. Layer it with whipped cream, or serve it plain—it’s that versatile. My kids even ask for it at school lunches (yes, even on a Tuesday).
- Make-Ahead Magic: Bake it once, enjoy it twice. This cake stays moist for days, so I’ll whip up a batch on Saturday and pull slices out for coffee dates, potlucks, or when I just need a treat. Plus, the leftovers freeze like a dream—no sad, dry crumbs here.
Step-by-step instructions for American vanilla cake
Here's the method for ultra-moist layers with that signature vanilla depth.
Prepare Wet Ingredients for Perfect Creaming
In a stand mixer fitted with the paddle attachment, beat the 1 cup unsalted butter (cold, cubed) and 2 cups granulated sugar on medium speed for 3-4 minutes. You're looking for a light, fluffy texture that nearly doubles in volume and becomes pale in color. This creaming process incorporates air, which creates that signature tender crumb.
Add the 4 whole large eggs, one at a time, mixing on low speed for 30 seconds after each addition until fully incorporated. Then add the 2 tbsp vanilla bean paste and 1 tsp vanilla extract, mixing for another 10 seconds. The vanilla bean paste delivers that authentic vanilla flavor you can't get from extract alone. Scrape down the sides of the bowl to ensure even mixing.
Combine Dry Ingredients and Alternate Wet/Dry
In a separate bowl, whisk together the 2.5 cups all-purpose flour, 2 tsp baking powder, and 0.5 tsp salt. Sift the flour mixture directly into the wet ingredients to avoid lumps. With the mixer on low speed, add one-third of the flour mixture, mixing until just combined.
Add ½ cup of the 1.5 cups buttermilk, mixing until incorporated. Repeat this process, alternating between the remaining flour mixture and the remaining buttermilk, ending with the last addition of flour. Mix on low speed just until the batter comes together—overmixing develops gluten and makes the cake tough. The batter should be thick but pourable.
Divide Batter and Bake for Even Layers
Preheat your oven to 350°F and grease two 9-inch round cake pans (or line with parchment circles). Divide the batter evenly between the prepared pans. Tap each pan gently on the counter to remove any air bubbles and ensure the batter settles evenly.
Bake for 25-30 minutes, or until a toothpick inserted into the center comes out clean. The cakes should be golden brown on top but still slightly springy to the touch. Rotate the pans halfway through baking for even heat distribution. Don't overbake—they'll continue cooking as they cool.
Cool and Assemble for Maximum Moisture
Remove the cakes from the oven and let them cool in the pans for 10 minutes. Then transfer them to a wire rack to cool completely. This gradual cooling prevents cracking and maintains that ultra-moist texture. While the cakes cool, you can prepare your favorite frosting or filling—this is the moment to get creative.
Once completely cool, place one cake layer on a serving plate and spread a layer of frosting. Repeat with the second layer, then frost the top and sides. The key to keeping this cake moist is to assemble it within 24 hours of baking. Store any leftovers at room temperature, covered loosely with plastic wrap, for up to 3 days.
Pro Tips For Making American Vanilla Cake
- Cream Butter and Sugar Slowly: I learned this the hard way—dumping cold butter into sugar and whipping it at high speed just makes a greasy mess. Instead, beat the butter and sugar on medium for 3-4 minutes until it’s pale and fluffy. The butter needs to melt gradually into the sugar, not clump like wet sand.
- Sift the Flour Twice: Skimping on this step means dense, uneven cake. Sift the flour before measuring, then sift it again directly into the bowl. This aerates it properly and cuts down on lumps—no last-minute scrambling to fix a gummy texture.
- Don’t Overmix the Batter: As soon as the flour disappears into the wet ingredients, stop mixing. I used to think extra folding made it lighter, but overworking it turns the cake tough. Two quick swirls with a spatula is all it needs—your future self will thank you for the tender crumb.
- Use Room-Temp Eggs: Cold eggs make the batter lumpy and can cause the cake to sink in the middle. Pop them out of the fridge 30 minutes before using—just enough time to warm up without turning rubbery. (Yes, even if you’re impatient like me.)
Creative variations of these flavors
Classic Vanilla Bean Twist
For an extra-special touch, split open a vanilla bean and scrape the seeds directly into the batter after adding the vanilla bean paste. This adds visible specks of vanilla and an intense, aromatic flavor.
I like to use Madagascar vanilla beans for their rich, floral notes. The seeds also make the cake look stunning when sliced—like a little surprise in every bite. 🌿
Citrus-Infused Variation
Brighten up your vanilla cake by adding 1 tbsp lemon or orange zest to the dry ingredients. The citrus complements the vanilla beautifully and adds a subtle freshness. Pair it with a lemon glaze (powdered sugar + lemon juice) for a zesty twist.
I find that Eureka lemons work best—their thick zest has the most flavor. This variation is perfect for spring or summer gatherings.
Spiced Chai Cake
Transform this classic into a spiced chai cake by adding 1 tsp ground cinnamon, ½ tsp ground cardamom, ½ tsp ground ginger, and ¼ tsp ground cloves to the dry ingredients. A pinch of black pepper (just ⅛ tsp) enhances the spices without overpowering.
Top with a cream cheese frosting spiked with 1 tsp vanilla bean paste for a cozy fall dessert. The spices warm up the vanilla flavor beautifully. ✨
Chocolate-Dipped Layers
For a decadent twist, dip the bottom of each cake pan in melted dark chocolate before adding the batter. This creates a thin chocolate layer at the base of each cake. After baking, the chocolate stays moist and adds a rich contrast to the vanilla.
I use 70% dark chocolate from Ghirardelli for the best balance. This variation feels extra luxurious but takes just a few extra minutes.
Gluten-Free Adaptation
Make this cake gluten-free by replacing the all-purpose flour with a 1:1 gluten-free baking flour blend like King Arthur Measure for Measure. You may need to add ¼ cup extra liquid (like buttermilk or milk) to compensate for the difference in absorption.
For best results, use Bob's Red Mill 1-to-1 Gluten-Free Flour. The texture will be slightly denser but still moist and delicious. This version works perfectly for guests with gluten sensitivities. 💪
Sheet Cake Version
For a crowd-pleasing sheet cake, pour the batter into a 9x13-inch baking pan lined with parchment paper. Bake for 30-35 minutes at 350°F until a toothpick comes out clean. Once cooled, spread with vanilla buttercream and decorate with fresh berries or sprinkles.
This version is ideal for birthdays or potlucks—it’s easy to serve and always a hit. The larger surface area also makes it perfect for layering with fillings like raspberry jam or whipped cream.
Nutrition facts
Frequently asked questions
Can I substitute buttermilk in this vanilla cake?
Yes! If you don't have buttermilk, mix 1.5 tbsp vinegar or lemon juice with 1.5 cups milk and let it sit for 5 minutes to curdle. This creates the same tangy moisture that makes the cake tender. For best results, use fresh buttermilk if possible—it adds that signature depth of flavor.
Why does my vanilla cake turn out dry?
Overbaking or overmixing are the most common causes. Remove the cake from the oven when a toothpick comes out clean (not before), and avoid mixing the batter more than necessary. Also, ensure your butter and eggs are at room temperature—they help retain moisture. For extra insurance, brush the warm layers with simple syrup (equal parts sugar and water) before frosting.
What's the difference between vanilla extract and vanilla bean paste?
Vanilla extract is a liquid made by soaking vanilla beans in alcohol, while vanilla bean paste is a thick, seed-filled spread that delivers more intense flavor and visible specks. For this recipe, the paste gives that authentic vanilla depth you can't get from extract alone. If you only have extract, use double the amount and add a pinch of ground vanilla bean seeds for texture.
Can I make this cake in a bundt pan?
Reduce the baking time to 30-35 minutes and check for doneness with a toothpick. A bundt pan creates beautiful ridges, but remember it won't yield layers—it's a single, showstopping cake. For best results, grease the pan thoroughly and use parchment paper for easy removal. This works especially well with a vanilla glaze drizzle.
How do I store leftovers to keep them moist?
Wrap the cake tightly in plastic wrap and store at room temperature for up to 3 days. For longer storage, freeze slices wrapped individually for up to 3 months. Always bring frozen cake to room temperature before serving—this prevents a dry texture. A quick tip: Place a slice of bread on the cake before wrapping to help maintain moisture.