
Desserts
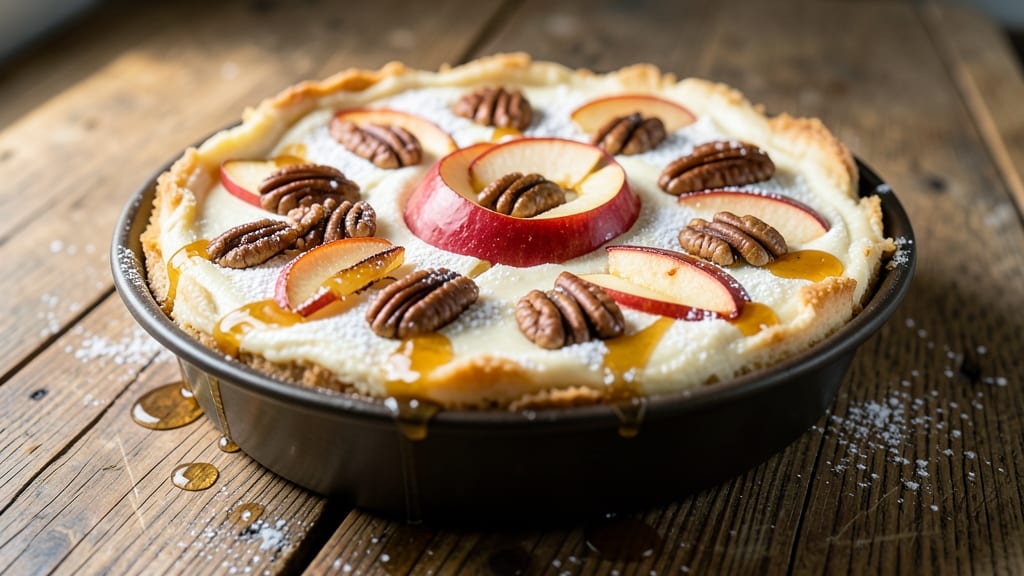
This apple walnut cheesecake recipe delivers the perfect balance of creamy filling, crunchy walnut topping, and caramelized apple swirls that taste like autumn in every bite.
The secret lies in a foolproof water bath method that ensures a silky texture without cracks, while the walnut-studded crust adds a satisfying contrast to the rich cheesecake base.
The recipe begins with a buttery walnut crust that bakes to golden perfection, providing the sturdy foundation this dessert needs. Between layers of velvety cheesecake, you'll weave ribbons of spiced caramelized apples that add natural sweetness and texture.
Baking times are carefully timed to create the ideal set—tender yet firm—so each slice holds its shape beautifully.
What makes this cheesecake truly special is the crunchy walnut topping, toasted to enhance their natural nuttiness before being sprinkled over the cooled filling. The result is a dessert that's elegant enough for holidays but simple enough for weeknight treats.
Every forkful combines creamy cheesecake, sweet apple swirls, and crunchy walnuts in perfect harmony.
Serve chilled with a dollop of whipped cream or a drizzle of caramel sauce for extra indulgence. This recipe is designed to impress without requiring advanced baking skills—just patience and attention to detail during the chilling process. Let's create a dessert that will become your new signature recipe.
Ingredients for apple walnut cheesecake
This apple walnut cheesecake recipe balances rich cream cheese filling with caramelized apple swirls and crunchy walnut topping for autumn-inspired indulgence.
| Ingredient | Amount | Notes |
|---|---|---|
| Walnuts 🥜 | 1 ½ cups | Toasted for enhanced nuttiness |
| All-Purpose Flour 🌾 | 1 cup | For crust structure |
| Granulated Sugar 🍚 | ½ cup | For crust sweetness |
| Unsalted Butter 🧈 | ¾ cup | Cold, cubed for crust |
| Large Eggs 🥚 | 3 whole | Room temperature preferred |
| Cream Cheese 🧀 | 32 oz | Full-fat for richness |
| Sour Cream 🥛 | ½ cup | Full-fat for creaminess |
| Granulated Sugar 🍚 | 1 ½ cups | For cheesecake sweetness |
| Apples 🍎 | 4 medium | Peeled, cored, diced |
| Brown Sugar 🍚 | ¼ cup | Packed for caramelization |
| Ground Cinnamon 🌿 | 1 tsp | For apple spicing |
| Vanilla Extract 🥛 | 1 tbsp | Pure extract preferred |
| Lemon Juice 🍋 | 1 tbsp | Freshly squeezed |
| Salt 🧂 | ½ tsp | Kosher preferred |
The walnuts deserve special attention—their flavor and texture make this cheesecake stand out. Buy them in bulk from stores like Whole Foods or Trader Joe's for superior quality, and toast them until golden for maximum nuttiness. For the apples, Honeycrisp or Fuji varieties work best—they caramelize beautifully without becoming mushy. The cream cheese should be at room temperature when mixing to avoid lumps, and Philadelphia brand is ideal for its consistent quality. If using pre-made crusts, avoid those with more than 20% sugar to maintain balance.
No walnuts? Pecans or hazelnuts work as substitutes, though the flavor will differ slightly. Substituting apples? Pears or peaches can work, but adjust the sugar slightly to compensate for their natural sweetness. For a dairy-free option, replace the sour cream with full-fat coconut yogurt, though texture may vary. The vanilla extract should be pure—Nielsen-Massey is a reliable brand. If you're short on time, pre-made caramel sauce from Trader Joe's can be used for serving, though homemade always tastes better. The cinnamon should be freshly ground if possible—Penzeys sells excellent whole spices for this purpose.
This cheesecake requires precise chilling—8 hours minimum in the fridge ensures proper set without cracking. The walnut topping can be prepared up to 3 days ahead and stored in an airtight container. For serving, a light dusting of powdered sugar enhances presentation, and additional caramel sauce can be drizzled over individual slices. Leftovers keep well for 4 days in the fridge, though the texture may slightly firm up—simply let sit at room temperature for 10 minutes before serving.
Why You'll Love This Recipe
- No-Fuss Layers: I swear by the crumb topping here—just walnuts, butter, and sugar pulsed together. No rolling, no fuss, and it adds that perfect buttery crunch without stealing the spotlight.
- Fall-In-Your-Mouth Crunch: That walnut-studded crust? It’s the secret weapon. The nuts stay slightly crisp while the cheesecake stays silky, and the apples? They caramelize just enough to make every bite feel like dessert.
- Weeknight to Holiday: Between us, this is my "I have guests but no time" dessert. Make it ahead, slice it up, and it’s still impressive. Serve it warm with a scoop of vanilla ice cream, or let it chill for that classic cheesecake vibe—no judgment.
- Leftovers? Best Part: Honestly, the second day is my favorite. The cheesecake firms up just enough to cut cleanly, and the walnuts soften into a rich, buttery texture. Wrap it tight, and it’ll keep for days—no sad, dry slices here.
Step-by-step instructions for apple walnut cheesecake
Master this layered dessert with a crunchy walnut crust and caramelized apple swirls.
Prepare the Crunchy Walnut Crust
Preheat your oven to 350°F and toast the 1.5 cups walnuts in a dry skillet over medium heat for 5-7 minutes, stirring constantly until they release their aroma and turn a rich golden brown. Let them cool completely before processing—this prevents steam from making your crust soggy.
Transfer the toasted walnuts to a food processor and pulse until you achieve a coarse, sand-like texture with some small clusters remaining. This balance creates the perfect crunch without losing structure. In a separate bowl, whisk together the 1 cup all-purpose flour, 0.5 cup granulated sugar, and 0.5 tsp salt. Add the walnut mixture and pulse just until combined.
Cut in the 0.75 cup cold, cubed unsalted butter using a pastry cutter or your fingers until the mixture resembles coarse crumbs. Press this firmly into the bottom of a 9-inch springform pan, creating an even layer. Bake for 10 minutes to set the crust, then set aside while you prepare the filling.
Create the Caramelized Apple Swirl
In a medium saucepan, combine the 4 peeled, cored, and diced medium apples, 0.25 cup packed brown sugar, 1 tsp ground cinnamon, 1 tbsp lemon juice, and 1 tbsp vanilla extract. Cook over medium heat for 8-10 minutes, stirring occasionally, until the apples soften and release their juices. The mixture should reduce slightly and develop a fragrant, caramelized aroma.
Transfer the apple mixture to a bowl and let it cool completely. This cooling step is crucial—it prevents the apples from steaming your cheesecake filling when you assemble the layers. While the apples cool, prepare the cheesecake batter by beating the 32 oz cream cheese and 0.5 cup sour cream together until completely smooth and lump-free.
Mix the Cheesecake Filling
In a separate large bowl, whisk together the 1.5 cups granulated sugar and 3 whole large eggs until the mixture is pale and slightly thickened. Gradually add the cream cheese mixture to the egg-sugar mixture, alternating between the two bowls to ensure even blending. This gradual incorporation prevents curdling and creates a silky texture.
Fold in the cooled apple mixture using a spatula, being careful not to overmix. The batter should be thick but pourable. Pour this over the pre-baked crust, spreading it evenly. To create the signature swirls, use the back of a spoon to gently drag lines through the batter, creating channels that will fill with caramelized apples during baking.
Bake to Perfection
Place the cheesecake in a water bath by wrapping the springform pan tightly in aluminum foil and placing it in a larger baking dish. Fill the dish with hot water halfway up the sides of the springform pan. This water bath ensures even baking and prevents cracking. Bake at 325°F for 50-60 minutes, or until the center is just set but still slightly jiggly.
Turn off the oven, crack the door open slightly, and let the cheesecake cool in the oven for 1 hour. This slow cooling process helps prevent cracking. Once cooled, remove from the water bath and let it cool completely at room temperature before refrigerating for at least 4 hours or overnight. This resting period allows the flavors to meld and the texture to set properly.
Pro Tips For Making Apple Walnut Cheesecake
- TOAST THE WALNUTS FIRST: I learned this the hard way—raw walnuts taste bitter in cheesecake. Toast them in a dry pan over medium heat for 5-7 minutes until golden and fragrant, stirring often. Let them cool completely before chopping, or they’ll release oil and make your crust greasy. (Yes, even if you’re impatient like me, skip the microwave—it won’t give the same flavor.)
- CHILL THE BUTTER-FLOUR MIX: The crust’s texture depends on this. Pulse the flour, butter, and sugar in a food processor until it resembles coarse crumbs, then dump it into the pan and press it down with your fingers. Freeze the pan for 15 minutes before baking—this stops the butter from melting too fast and turning the crust into a sad, greasy mess.
- DON’T OVERMIX THE FILLING: After folding in the apples and walnuts, give the batter one gentle turn with a spatula. Overmixing aerates the eggs too much, and your cheesecake will end up dense or even crack on top. Stop when the streaks just disappear—like underbaking toast, sometimes less is more.
- BAKE UNTIL THE EDGE IS SET: The filling’s center will still jiggle slightly when done, but the edges should pull away cleanly from the pan. If you pull it out at 325°F (160°C) looking undercooked, tent it with foil and bake another 5-10 minutes. A water bath helps, but don’t skip the final 10 minutes out of the bath—it guarantees a smooth top. (Your future self will thank you.)
Essential equipment for apple walnut cheesecake
Springform Pan
This is your most critical piece of equipment for this recipe. A 9-inch springform pan creates the perfect ratio of surface area to volume, allowing even baking and easy release.
I recommend the Nordic Ware Natural Aluminum pan—it conducts heat beautifully and releases effortlessly. Avoid non-stick pans for this recipe; they don’t provide the same structural support during baking. 🧑🍳
Food Processor
A high-quality food processor is essential for creating the perfect walnut crust texture. I use my Cuisinart DFP-14BCNY—it handles nuts efficiently without overheating. Pulse the walnuts until you achieve a coarse, sand-like texture with some small clusters remaining.
This balance gives you both crunch and structure. If you don’t have one, a strong blender or even a rolling pin and your hands will work, but expect slightly more effort.
Water Bath Setup
For a flawless bake, you’ll need a large roasting pan that can accommodate your springform pan with room to spare. I use a Calphalon Classic 16-inch roasting pan—it’s sturdy and holds hot water perfectly.
The water bath prevents cracking by creating a gentle, even heat distribution. Wrap the springform pan tightly in heavy-duty aluminum foil before placing it in the water bath to protect it from moisture. 💧
Mixing Bowls
Use two medium-sized mixing bowls—one for the cheesecake batter and one for the apples. I prefer stainless steel bowls because they’re durable and don’t retain flavors. The 3-quart size is ideal for blending the cream cheese and eggs smoothly.
For the apples, a heat-safe glass bowl works well for cooling and prevents plastic odors from transferring to your dessert. Avoid plastic if possible, as it can warp with heat.
Spatulas & Scrapers
A flexible silicone spatula is your best friend for folding in the apple mixture without overmixing. I keep a OXO Good Grips silicone spatula handy for this step—it’s gentle on bowls and gets into every corner.
For spreading the batter evenly, a long, thin offset spatula (like the West Bend 8-inch) helps create those beautiful swirls. Don’t skip this tool—it makes all the difference in presentation! 🎨
Measuring Tools
Precision is key in baking, so invest in high-quality measuring cups and spoons. I use the OXO Good Grips stainless steel set—they’re accurate and easy to read.
For the cream cheese and sour cream, a kitchen scale (like the Escali Primo) ensures consistency, especially if you’re making this recipe multiple times. Weighing these ingredients by ounces gives you the most reliable results for a smooth, lump-free filling.
Nutrition facts
Frequently asked questions
Can I make this cheesecake without a water bath?
While possible, using a water bath is highly recommended to prevent cracking. Without it, the cheesecake may develop surface cracks or uneven baking. If you must skip it, bake at 300°F for 60-70 minutes instead of 325°F, and cover the edges with foil after 30 minutes to slow cooking. The texture won't be as perfect, but it'll still be delicious!
How do I store leftovers?
Store your cheesecake in an airtight container in the fridge for up to 5 days. For best texture, let slices sit at room temperature for 10-15 minutes before serving. You can also freeze individual portions wrapped tightly in plastic for up to 3 months. Thaw overnight in the fridge for optimal texture.
What's the best way to serve this dessert?
Garnish with a light dusting of powdered sugar and a few toasted walnut halves for extra crunch. A drizzle of homemade caramel sauce or a dollop of whipped cream elevates the presentation. Serve chilled with a cup of chai tea or coffee for the perfect autumn dessert experience.
Why did my cheesecake crack?
Cracking usually happens from temperature changes or opening the oven too soon. To prevent it: 1) Let the cheesecake cool gradually in the oven after baking, 2) Avoid sudden temperature shifts when removing from the oven, and 3) Ensure your oven is fully preheated before baking. Most cracks are just cosmetic and don't affect taste!
Can I use store-bought crust?
Yes, but for best results, choose a low-sugar graham cracker crust (under 20% sugar) to maintain flavor balance. If using a pre-made crust, bake it according to package instructions before adding the filling. For extra crunch, sprinkle additional toasted walnuts on top after baking.