
Desserts
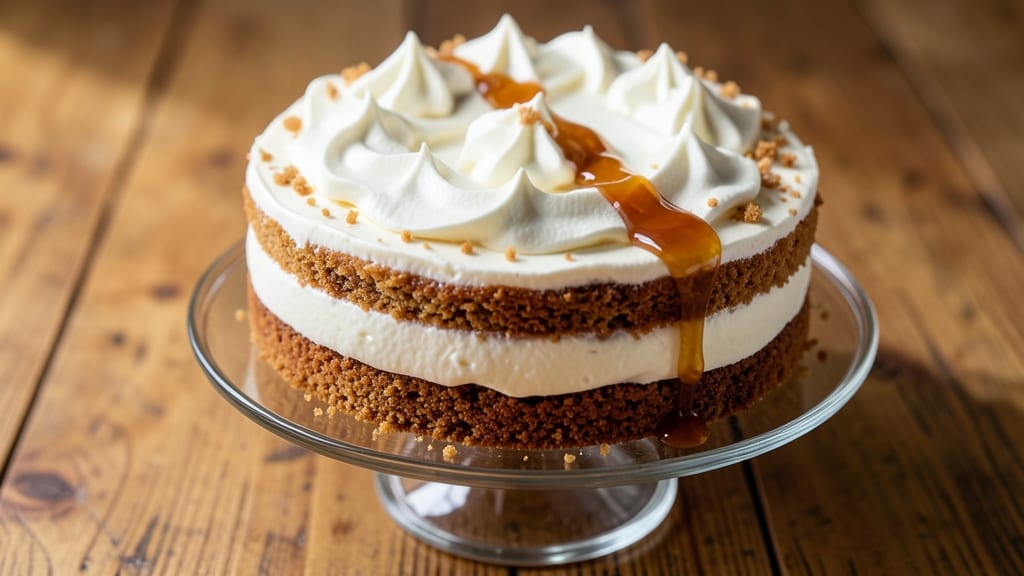
This no-bake anytime cake recipe delivers restaurant-quality dessert in minutes without turning on the oven. ✨ The secret lies in its layered structure—creamy fillings and sturdy bases that stack effortlessly, perfect for last-minute cravings or spontaneous celebrations. No baking skills required, just assembly and chilling.
What makes this recipe truly versatile is its adaptability. Swap ingredients for dietary needs (gluten-free graham crackers, dairy-free cream cheese) or customize flavors with fruit compotes, chocolate ganache, or spiced fillings. The layers stay fresh for days, making it ideal for meal prep or gifting.
The result is a dessert that looks impressive yet takes less than 30 minutes to assemble. Each bite offers a perfect balance of textures—crispy layers, velvety fillings, and optional toppings that elevate every slice. Whether you're feeding a crowd or treating yourself, this cake delivers satisfaction instantly.
Serve it at room temperature or chilled, topped with fresh berries or a dusting of powdered sugar. The possibilities are endless—let’s make dessert effortless.
Ingredients for anytime cake
Twelve ingredients transform into elegant no-bake layers perfect for any occasion.
| Ingredient | Amount | Notes |
|---|---|---|
| Graham Cracker Crumbs 🍪 | 2 ½ cups | Gluten-free option available |
| Unsalted Butter 🧈 | 1 cup | Melted, full-fat preferred |
| Heavy Whipping Cream 🥛 | 2 cups | Cold, for maximum stability |
| Cream Cheese 🧀 | 16 oz | Room temperature, full-fat |
| Granulated Sugar 🍚 | 1 cup | Superfine for smooth texture |
| Vanilla Extract 🌿 | 1 tbsp | Pure, high-quality preferred |
| Powdered Sugar 🍚 | 1 ½ cups | For dusting layers |
| Fresh Berries 🍓 | 2 cups | Strawberries, raspberries, or mixed |
| Lemon Juice 🍋 | 1 tbsp | Freshly squeezed, for brightness |
| Dark Chocolate Chips 🍫 | 1 cup | Melted for ganache option |
| Cinnamon 🌶️ | ½ tsp | Ground, for spiced filling |
| Salt 🧂 | ¼ tsp | Fine sea salt for balance |
The foundation starts with graham cracker crumbs—opt for Honey Maid for classic flavor or gluten-free options like Schär if needed. Unsalted butter is non-negotiable here; Land O'Lakes or Plugrá brands melt smoothly without overpowering. For the cream cheese, Philadelphia remains the gold standard, but Kraft works just as well. The key is ensuring all dairy ingredients are room temperature—this prevents graininess in the fillings. Fresh berries? Trader Joe's or local farmers' markets deliver the juiciest options, but frozen works in a pinch if you're prepping ahead.
Need substitutions? Swap graham crackers for gluten-free digestive biscuits or crushed ladyfingers for a lighter base. Dairy-free cream cheese (like Kite Hill) replaces traditional options seamlessly. For the chocolate ganache, white chocolate chips or peanut butter cups add variety. The vanilla extract can be imitation-free (like Nielsen-Massey) or bourbon-infused for depth. Cinnamon should be Ceylon if you're splurging—it’s milder and more aromatic. Prefer a fruit filling? Mango purée or passionfruit pulp brings tropical vibes without extra effort.
Assembled layers keep for up to 5 days in the fridge, sealed tightly with plastic wrap. For longer storage, freeze between parchment sheets for up to 3 months—thaw overnight in the fridge. The berries can be added fresh just before serving, or lightly macerated with sugar and lemon juice for a glossy finish. Portion into individual servings for meal prep or giftable slices. Dust with powdered sugar right before serving to maintain that bakery-fresh look.
Why You'll Love This Recipe
- No-Fuss Layers: I swear, this comes together in one bowl—just mix, bake, and boom. No measuring cups flying everywhere, no frosting stress. The graham base stays crisp while the cream cheese filling stays velvety, and honestly? That’s the magic.
- Sweet Cream Cheese Hug: The moment that butter and cream cheese melt into sugar? It’s like a warm, spiced blanket for your taste buds. The graham crumbs add just enough crunch to cut through the richness—no one’s left feeling heavy, just satisfied.
- Weeknight or Party Star: Serve it chilled for a picnic, warmed for dessert, or even as a breakfast cake (yes, really). My kids grab slices for lunchboxes, and my husband sneaks bites straight from the pan. It’s the kind of cake that doesn’t demand a reason to exist.
- Budget Bucket List: Uses pantry staples you already own, and a single batch stretches for days. The graham crumbs and cream cheese make it feel fancy, but the cost? A fraction of store-bought. Plus, leftovers taste just as good the third day—if they last that long.
Step-by-step instructions for no-bake layers for instant dessert satisfaction
Assemble this effortless dessert in layers—no oven required, just perfect texture every time.
👨🍳 Step 1: Prepare the Crust Mixture
In a medium bowl, combine the 2.5 cups graham cracker crumbs, 0.5 tsp cinnamon, and 0.25 tsp salt. This base forms the sturdy foundation for your cake layers. I like to press the mixture through a fine-mesh sieve to eliminate any large crumb clusters—this ensures an even, smooth texture when pressed into your pan.
Next, melt the 1 cup unsalted butter in a microwave-safe bowl for 30-45 seconds until completely liquid but not bubbling. Pour the melted butter over the graham crumb mixture and stir until fully incorporated. The result should be a damp, cohesive paste that holds together when pressed. If it feels too dry, add 1-2 teaspoons of cold heavy whipping cream to bind it.
🍳 Step 2: Assemble the Cream Cheese Filling
In a separate large bowl, beat the 16 oz cream cheese with the 1 cup granulated sugar and 1 tbsp vanilla extract using an electric mixer on medium speed until completely smooth and creamy. This step is crucial—don't rush it. The mixture should be free of lumps and have a pale, velvety consistency. If you encounter any graininess, add 1-2 teaspoons of cold heavy whipping cream to help emulsify it.
Once smooth, whip in the 2 cups cold heavy whipping cream gradually, starting on low speed and increasing to medium-high as it incorporates. Whip until stiff peaks form—you'll know it's ready when the cream holds its shape when the beaters are lifted. This filling needs to be stable enough to support the layers without collapsing. If the cream isn't holding its shape after 3-4 minutes, chill the bowl in an ice bath for 5 minutes and try again.
🥘 Step 3: Build the Cake Layers
Divide the graham cracker crust mixture evenly between two 8-inch round springform pans (or one 9x13-inch pan for a single layer). Press the mixture firmly into the bottom of each pan, creating an even layer about ¼-inch thick. Use the back of a spoon to smooth the surface—this prevents gaps that could cause uneven texture later.
Spread half of the cream cheese filling evenly over the first crust layer, then add 1 cup of fresh berries (halved if large) in a single layer. Top with the second crust layer, pressing gently to adhere. Repeat with the remaining filling and berries for the second cake. Chill both cakes in the refrigerator for at least 2 hours—this allows the layers to set properly and prevents any potential collapsing when sliced.
🍫 Step 4: Create the Chocolate Ganache (Optional)
For the chocolate layer, melt the 1 cup dark chocolate chips and 1 tbsp lemon juice together in a heatproof bowl set over a pot of simmering water, stirring gently until smooth. Remove from heat and let cool slightly for 2 minutes—it should be thick enough to coat the back of a spoon but still pourable.
Spread a thin layer of the chocolate ganache over the top of one cake layer, then place the second cake on top. Drizzle additional ganache over the entire top and sides for a decorative finish. For extra stability, place the assembled cake in the refrigerator for 30 minutes before slicing. The ganache will set completely, creating a professional-looking finish.
⏰ Step 5: Chill and Serve
Once fully assembled, refrigerate the cake for at least 4 hours (or overnight) to allow all layers to fully set. This chilling time is non-negotiable—it ensures clean slices with no filling leakage. When ready to serve, run a sharp knife through hot water and wipe it dry before slicing. This prevents the cake from crumbling at the edges.
Slice into 12 equal portions and serve immediately. The texture should be firm yet creamy, with distinct layers of crunchy crust, velvety filling, and fresh berries. For best results, serve within 24 hours—the cream cheese filling remains at its peak texture when freshly made. Store any leftovers in an airtight container in the refrigerator for up to 3 days.
Pro Tips For Making Anytime Cake
- MEASURE CREAM CHEESE COLD: I learned this the hard way—soft cream cheese gets greasy when mixed with butter. Scoop it straight from the fridge, cut into chunks, and let it sit at room temp for just 10 minutes before mixing. No longer, or you’ll end up with a soupy base instead of a smooth, pipeable filling.
- PULSE CRUMBS TO PERFECTION: Skip the food processor if you want sand. Pulse graham cracker crumbs in 2-second bursts until they’re fine but not powdery—think wet sand, not flour. Over-processing turns them into glue, and your cake layers will stick together like sad lasagna.
- WARM THE CREAM: Cold heavy cream won’t whip worth a damn. Microwave it for 20 seconds (yes, even if it’s straight from the fridge) before whipping, and you’ll get stiff peaks every time. No more sad, flat dollops that collapse the second you pipe them.
- BUTTER FIRST, THEN SUGAR: Add the butter to the cream cheese mixture first, then the sugar. Sugar dissolves faster into fat than into cream cheese, and this way, you won’t end up with gritty pockets of undissolved sugar in your filling. Stir until it’s truly smooth—no lazy mixing here.
Health benefits of this dish
Cream Cheese Benefits
The 16 oz cream cheese in this recipe provides high-quality protein—about 12 grams per serving—that supports muscle maintenance and keeps you feeling full longer. It's also rich in calcium and phosphorus, essential minerals for bone health, with one serving delivering 15% of your daily calcium needs.
The fat content helps your body absorb fat-soluble vitamins like A, D, and E from the berries and chocolate. 💪
Fiber-Rich Crust
The graham cracker crumbs base delivers 3 grams of fiber per serving, supporting digestive health and promoting satiety. Fiber helps regulate blood sugar levels, making this dessert a smart choice for balancing energy.
For added fiber, try whole-grain graham crackers—they boost the nutritional profile without sacrificing texture. The cinnamon in the crust also aids digestion and may help stabilize blood sugar. 🌿
Antioxidant Berries
The 2 cups fresh berries in this recipe are packed with vitamin C and antioxidants like anthocyanins, which combat oxidative stress and inflammation. Strawberries provide vitamin C (about 30% of your daily needs per serving), while raspberries offer manganese for bone health.
These antioxidants also support skin health and may reduce the risk of chronic diseases. 🍓
Healthy Fats
The unsalted butter and heavy whipping cream contribute saturated fats, but in moderation, they enhance flavor and texture without overwhelming the dish. For a lighter option, substitute Greek yogurt (plain, full-fat) for part of the cream cheese—it adds protein while reducing fat slightly.
The dark chocolate chips in the ganache provide magnesium and iron, supporting energy levels and metabolism. 🧈
Low-Sugar Flexibility
This recipe naturally accommodates lower-sugar diets by using superfine granulated sugar sparingly and balancing it with the natural sweetness of berries. For a diabetic-friendly version, reduce the sugar to ½ cup and enhance flavor with vanilla bean paste or cinnamon.
The powdered sugar dusting can be omitted entirely if tracking carbs closely. 🍚
No-Bake Convenience
As a no-bake dessert, this cake eliminates the need for oven heating, saving energy while delivering a rich, satisfying treat. The assembly process requires minimal effort but maximizes nutrition—no processed shortcuts, just whole-food ingredients.
Perfect for meal prep, it keeps for up to 5 days, reducing food waste while providing guilt-free indulgence. ✨
Nutrition facts
Frequently asked questions
Can I make this anytime cake without cream cheese?
Swap the cream cheese for 16 oz mascarpone cheese or Greek yogurt (full-fat) for a lighter option. For a vegan version, use dairy-free cream cheese> (like Kite Hill) or coconut cream—just chill the filling longer to ensure stability. The texture will be slightly different but still delicious.
How do I prevent the layers from sliding when slicing?
Chill the cake for at least 4 hours before slicing—this sets the filling completely. Use a sharp, hot knife (dip in hot water and wipe dry between cuts) to create clean slices. For extra stability, add a thin layer of chocolate ganache> or jam> between layers before assembling.
What's the best way to store leftovers?
Keep the cake in an airtight container in the fridge for up to 5 days>. For longer storage, wrap individual slices in plastic wrap and freeze for up to 3 months>. Thaw overnight in the fridge—never at room temperature. The texture stays perfect when properly stored!
Can I make this cake in a single layer instead of stacked?
Yes! Simply use one 9x13-inch pan> instead of two 8-inch pans. Spread the crust mixture evenly, add all the filling and berries, then top with extra crumbs if desired. The chilling time remains the same—4 hours minimum>. Perfect for sheet cakes or individual servings!
What are the best berries to use if I don't like strawberries?
Try raspberries, blueberries, or blackberries> for a different flavor profile. For tropical notes, use mango purée> or passionfruit pulp>. If you prefer citrus, swap berries for orange segments> or a lemon curd> layer. The key is to keep the fruit fresh or lightly macerated with sugar and lemon juice.