
Desserts
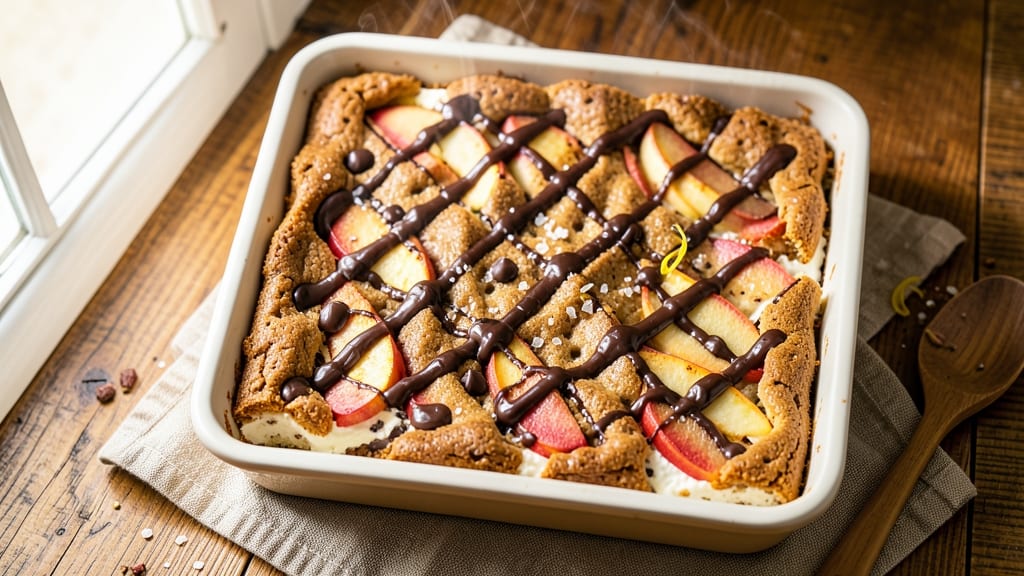
This apple blondie cheesecake bars recipe delivers the perfect balance of textures and flavors—chewy blondie layers, velvety cheesecake filling, and caramelized apple crunch in every bite.
The secret lies in baking the blondie base first, creating a sturdy foundation that holds up to the creamy cheesecake layer and sweet apple topping. I developed this recipe after years of testing dessert combinations, and it never fails to impress.
The blondie base starts with a classic blondie recipe—browned butter, melted chocolate, and a touch of cinnamon—baked until golden and set. While it cools, the cheesecake filling comes together with cream cheese, sugar, and vanilla, creating a smooth, tangy layer that contrasts beautifully with the blondie.
The real magic happens with the apple topping: thinly sliced apples caramelized in butter and brown sugar until tender and glossy.
What you’ll end up with is a dessert that’s as visually stunning as it is delicious—golden blondie layers topped with creamy cheesecake and a glossy apple caramel. The texture contrast is what makes this recipe special: chewy blondie, smooth cheesecake, and tart, caramelized apple in every bite.
It’s the kind of dessert that feels indulgent but is simple enough to make for any occasion.
Perfect for potlucks, holiday gatherings, or a special weekend treat, these bars stay fresh for days in the refrigerator. Serve with a dollop of whipped cream or a sprinkle of cinnamon for extra flair. Let’s get baking!
Ingredients for apple blondie cheesecake bars
Golden blondie layers meet creamy cheesecake and caramelized apples in this showstopping dessert.
| Ingredient | Amount | Notes |
|---|---|---|
| All-Purpose Flour 🌾 | 2 cups | Sifted for even texture |
| Granulated Sugar 🍚 | 1 ½ cups | Light brown preferred |
| Unsalted Butter 🧈 | 1 cup | Browned for nutty flavor |
| Semisweet Chocolate Chips 🍫 | 1 ½ cups | High quality chocolate |
| Large Eggs 🥚 | 2 whole | Room temperature |
| Vanilla Extract 🌿 | 1 tbsp | Pure extract preferred |
| Ground Cinnamon 🍃 | 1 tsp | Freshly ground preferred |
| Salt 🧂 | ½ tsp | Fine sea salt |
| Cream Cheese 🧀 | 8 oz | Room temperature |
| Powdered Sugar 🍚 | 1 cup | Sifted for smooth texture |
| Apples 🍎 | 2 medium | Thinly sliced, peeled |
| Light Brown Sugar 🍚 | ½ cup | Packed tightly |
| Unsalted Butter 🧈 | ¼ cup | Cold for caramelizing |
| Ground Cinnamon 🍃 | ½ tsp | For apple topping |
The blondie base starts with browned butter—don't skip this step, it adds incredible depth. King Arthur flour or Bob's Red Mill work best for texture. For the chocolate, Ghirardelli chips or Valrhona elevate the flavor. Apples should be firm and crisp—Honeycrisp or Fuji slice beautifully. Peel and slice them thinly, almost translucent, for perfect caramelization. The cream cheese matters here too: Philadelphia brand is the gold standard, but any full-fat block works if brought to room temperature.
No brown sugar? Substitute equal parts granulated sugar and molasses for the apple topping. Short on apples? Pears or peaches work in a pinch, but adjust the caramelizing time. The blondie base can be made ahead and refrigerated for up to 3 days—just let it come to room temperature before adding the cheesecake layer. For extra richness, fold 1 oz white chocolate into the blondie batter. The cheesecake filling should be smooth—beat the cream cheese for 2-3 minutes until completely creamy to avoid lumps.
Assemble the bars and refrigerate for at least 4 hours (overnight is ideal) to let flavors meld. Store in an airtight container with parchment between layers for up to 5 days. Freeze for 2 months—thaw at room temperature before serving. The apple topping can be prepped ahead and reheated with the bars for 30 seconds to restore crispness. Serve with a sprinkle of flaky sea salt or a dollop of whipped cream for the full experience.
Why You'll Love This Recipe
- One-Bowl Wonder: I swear by this recipe when I’m too tired to measure three separate bowls. Just cream the butter and sugar, toss in the flour and eggs, fold in those melty chocolate chips—done. The apples get diced while the oven preheats, so no extra steps.
- Caramelized Apple Magic: That buttery, warm apple filling? It’s the star. The cinnamon and sugar make it taste like autumn in your mouth, while the blondie layer stays soft and chewy—like a hug from a dessert. (Yes, even on a Tuesday night.)
- Party in a Pan: Slice these into squares, and suddenly you’ve got a crowd-pleaser for potlucks, book club gatherings, or just because. They’re sturdy enough to travel, but still feel fancy enough to serve on a platter. My in-laws think I baked them from scratch—our secret.
- Budget-Friendly Indulgence: You’re using pantry staples—flour, sugar, butter—and a bag of chocolate chips stretches far. The apples add freshness without breaking the bank, and leftovers? They disappear faster than I can say “second slice.” (Between us, they’re my go-to for lunch the next day.)
Step-by-step instructions for apple blondie cheesecake bars
Here's how to layer rich cheesecake filling with caramelized apple crunch for perfect bars every time.
Prepare the Cheesecake Filling
In a medium bowl, beat the 8 oz cream cheese and 1 cup unsalted butter together until completely smooth and creamy. I use an electric mixer for this step—it ensures no lumps remain. Gradually add the 1.5 cups granulated sugar and mix until fully incorporated. The mixture should be pale and fluffy, almost like frosting.
Add the 2 whole large eggs, one at a time, mixing well after each addition. Then stir in the 1 tbsp vanilla extract and 1 tsp ground cinnamon. Finally, fold in the 2 cups all-purpose flour and 0.5 tsp salt using a spatula until just combined. Overmixing at this stage can make the bars dense, so stop when you see a few flour streaks remaining.
Assemble the Blondie Base Layer
Preheat your oven to 350°F and line a 9x13-inch baking pan with parchment paper, leaving an overhang for easy removal. In a separate bowl, melt the 1 cup unsalted butter in the microwave for 30-second intervals, stirring between each, until fully melted. Add the 1.5 cups granulated sugar and mix until combined.
Incorporate the 2 whole large eggs, one at a time, then stir in the 1 tbsp vanilla extract, 1 tsp ground cinnamon, and 0.5 tsp salt. Gradually fold in the 2 cups all-purpose flour until a thick, cookie-like dough forms. Press two-thirds of this dough evenly into the prepared pan, creating a firm base layer. This foundation is crucial—it needs to be solid to support the cheesecake filling.
Spread the Cheesecake Filling
Smooth the cheesecake filling mixture evenly over the blondie base, spreading it to the edges of the pan. Use an offset spatula to create an even, level surface. This layer should be about ½-inch thick—thicker areas will take longer to bake and may become rubbery.
Next, sprinkle 1.5 cups semisweet chocolate chips evenly over the cheesecake layer. Press them lightly into the top so they adhere well. This creates pockets of molten chocolate throughout each bar, adding rich flavor and texture contrast. Bake the entire assembly in the preheated oven for 35-40 minutes, or until the edges are golden brown and a toothpick inserted near the center comes out clean.
Prepare the Apple Topping
While the bars bake, prepare the apple topping by peeling and thinly slicing the 2 medium apples. Toss the apple slices with 0.5 cup light brown sugar, 0.25 cup unsalted butter (cut into small pieces), and 0.5 tsp ground cinnamon. Arrange the apple mixture on a parchment-lined baking sheet and bake at 350°F for 10-12 minutes, stirring once, until the apples soften and the butter melts into a caramelized sauce.
Remove the apple mixture from the oven and let it cool slightly. Once the cheesecake bars are done baking, spread the caramelized apple mixture evenly over the top, pressing down gently to create a crunchy layer. Return the pan to the oven for 5-7 minutes to set the topping and allow the flavors to meld together.
Cool and Cut for Perfect Bars
Allow the bars to cool completely in the pan for at least 2 hours before cutting. This resting time is essential—it lets the layers set properly and prevents the bars from falling apart when sliced. Once fully cooled, lift the bars out of the pan using the parchment overhang and cut into 16 equal squares using a sharp knife.
The final result should be a creamy cheesecake center with a crisp blondie base and a caramelized apple crunch on top. Each bite delivers the perfect balance of textures—soft, chewy, and crunchy—with sweet apple and chocolate flavors throughout. Store any leftovers in an airtight container in the refrigerator for up to 5 days or freeze for longer storage.
Pro Tips For Making Apple Blondie Cheesecake Bars
- Bake in Two Stages: I learned this the hard way—blondie cheesecake bars need patience. Bake the base layer (blondie part) for 12-15 minutes until just set, then add the cheesecake topping and finish at 325°F (not 350°F) for 20-25 minutes. The lower temp prevents cracking while letting the apples soften properly.
- Chop Apples Small: No one wants a mouthful of crunchy apple. Dice the apples into ¼-inch pieces—small enough to melt into the cheesecake layer but still recognizable. Toss them with 1 teaspoon of flour first to prevent sinking and keep them tender, not mushy.
- Press Down the Batter: The blondie base is the foundation, and skipping this step means a dense, uneven texture. After spreading the batter in the pan, use a spatula to press it firmly into the corners—especially the edges. This guarantees a crispy, even crust that holds up when cutting.
- Use Room-Temp Eggs: Cold eggs make the cheesecake layer gummy and prone to cracking. Take the eggs out of the fridge 30 minutes before mixing—just enough time to warm up without turning rubbery. If you’re in a rush, place them in a bowl of warm water for 10 minutes. The difference is noticeable.
Flavor customization for this dish
Sweet-Spicy Apple Twist
Add ½ tsp cayenne pepper and 1 tsp smoked paprika to the blondie base for a subtle kick. Top with caramelized apples tossed in 1 tbsp honey> and ¼ tsp cinnamon—the heat balances the sweetness beautifully. Serve with a sprinkle of chili powder for extra zing. 🌶️
Brown Butter Caramel
Take the apple topping to the next level by making a brown butter caramel. Melt ½ cup unsalted butter until nutty brown, then whisk in ½ cup brown sugar and 2 tbsp heavy cream.
Drizzle this over the baked bars before adding the apple slices for a glossy, rich finish. Trust me, this makes all the difference!
Salted Caramel Swirl
Fold ½ cup salted caramel sauce (like Trader Joe’s or Smucker’s) into the cheesecake filling before spreading it over the blondie base. The salty-sweet swirls create pockets of decadence in every bite. Top with caramelized apples and a pinch of flaky sea salt for contrast. 💫
Caramel Apple Crumble
Skip the caramelized apple topping and make a crumble instead! Mix ½ cup rolled oats, ¼ cup chopped walnuts, 2 tbsp brown sugar, and 1 tbsp melted butter.
Sprinkle over the cheesecake layer before baking, then add fresh apple slices on top. The crunchy topping adds texture while keeping the apple fresh and bright.
Espresso Blondie Boost
For coffee lovers, stir 1 tbsp instant espresso powder> into the blondie base. The deep, earthy notes pair perfectly with the creamy cheesecake and sweet apples.
Use dark roast coffee> for the strongest flavor. This twist is especially great with a dollop of whipped cream and a sprinkle of cocoa powder. ☕
Citrus Zest Brightness
Add 1 tbsp lemon zest> to the cheesecake filling for a bright, tangy kick. Top with caramelized apples tossed in 1 tbsp orange juice> and a pinch of salt. The citrus cuts through the richness, making every bite feel fresh and vibrant. Perfect for spring or summer gatherings!
Nutrition facts
Frequently asked questions
Can I make these bars without baking the apple topping separately?
Yes! For convenience, toss the sliced apples with the brown sugar and cinnamon, then spread them directly over the baked cheesecake layer. Bake for an extra 8-10 minutes at 350°F to caramelize them slightly. The texture will be softer but still delicious—just add a sprinkle of cinnamon after baking for extra flavor.
Why did my blondie base crack when I added the cheesecake filling?
This usually happens if the blondie layer isn't fully cooled before adding the filling. Let it rest for at least 1 hour (or until just warm to the touch) to prevent cracking. Also ensure your pan is evenly lined with parchment—uneven cooling can cause stress points. For extra stability, chill the blondie base for 30 minutes in the fridge before adding the cheesecake layer.
How can I make this recipe gluten-free?
Replace the all-purpose flour with a 1:1 gluten-free baking flour blend> (like Bob's Red Mill or King Arthur) and add ½ tsp xanthan gum to the blondie base. For the cheesecake filling, use the same GF flour blend. The texture will be slightly denser, but the flavor remains rich. Test with a small batch first to adjust consistency.
Can I use store-bought blondie or cheesecake layers instead?
For a shortcut, use a pre-baked blondie mix> (like Betty Crocker) for the base and a store-bought cheesecake filling**> (like Philadelphia). Just ensure the blondie layer is sturdy enough to hold the filling—press it firmly into the pan. The texture will differ slightly, but it’s a great time-saver for busy days.
What’s the best way to store leftovers?
Wrap the bars tightly in plastic wrap, then place them in an airtight container with parchment paper between layers. They’ll stay fresh in the fridge for up to 5 days. For longer storage, freeze for 2 months. To revive, let them sit at room temperature for 10 minutes before serving—this restores the creamy texture.