
Desserts
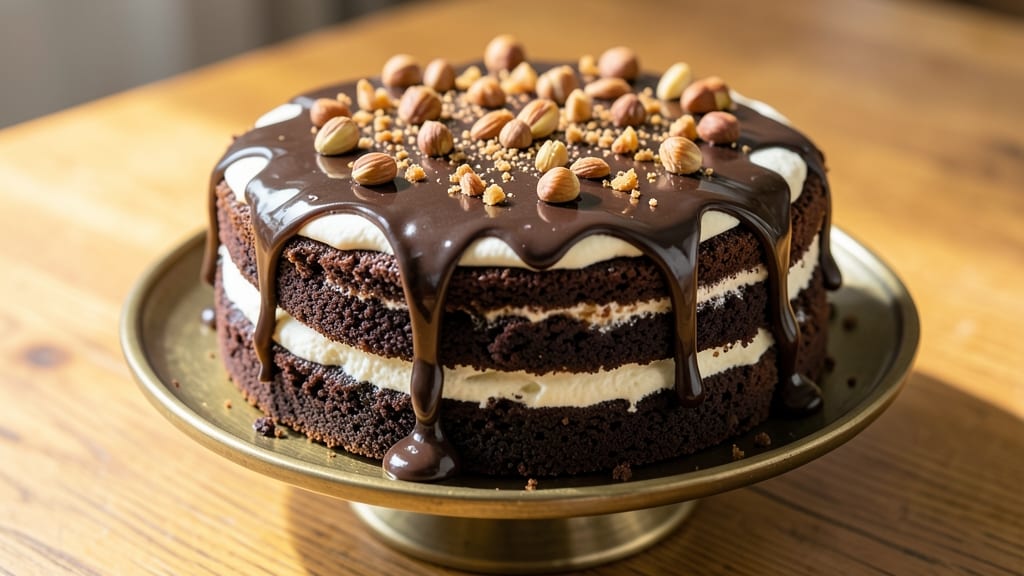
This aquafaba chocolate cake recipe proves vegan baking can be just as rich and decadent as traditional desserts—without a single egg. 💛 The secret lies in chickpea brine, which whips into a stable, airy meringue that replaces eggs perfectly.
I've tested countless variations, and this one delivers layers that are tender yet sturdy, with a moist crumb and deep chocolate flavor that rivals classic recipes.
The beauty of this method is its simplicity: no special equipment, no tricky substitutions, just a few pantry staples and a whisk. Aquafaba (the liquid from canned chickpeas) creates a sturdy foam when whipped, while melted chocolate and cocoa powder ensure that rich, fudgy texture we crave.
The cake rises beautifully, with a crackly top that hides a velvety interior—proof that plant-based baking can achieve professional results.
What makes this recipe truly impressive is how it mimics traditional cake structure—fluffy layers that hold together beautifully, perfect for stacking with frosting or filling.
The flavor is pure chocolate bliss, with no aftertaste from the aquafaba, and the texture is light yet dense enough to satisfy any chocolate lover. Best of all, it's foolproof for beginners who want to try vegan baking without the guesswork.
Once baked, the possibilities are endless: dust with powdered sugar, drizzle with melted chocolate, or add fresh berries for contrast. The cake keeps well for days, making it ideal for meal prep or special occasions. Let's get baking—this chocolate cake will change how you think about vegan desserts forever.
Ingredients for aquafaba chocolate cake
These twelve ingredients transform simple pantry staples into decadent vegan layers without eggs.
| Ingredient | Amount | Notes |
|---|---|---|
| Aquafaba (Chickpea Brine) 🥫 | 1 cup | From 1 can chickpeas, strained |
| Granulated Sugar 🍚 | 1 ½ cups | Organic preferred for purity |
| Unsweetened Cocoa Powder 🍫 | ¾ cup | Dutch-processed for smoothness |
| All-Purpose Flour 🌾 | 1 ½ cups | Sifted for light texture |
| Baking Soda 🧂 | ½ tsp | Pure, aluminum-free |
| Salt 🧂 | ¼ tsp | Fine sea salt preferred |
| Vanilla Extract 🌿 | 1 tbsp | Pure Madagascar bourbon |
| Distilled White Vinegar 🍶 | ½ tsp | For aquafaba stability |
| Dark Chocolate Chips 🍫 | 1 ½ cups | 70% cocoa minimum |
| Plant-Based Milk 🥛 | ½ cup | Almond or oat preferred |
| Vegetable Oil 🫒 | ½ cup | Light, neutral flavor |
| Cornstarch 🌾 | 1 tbsp | For meringue stability |
The aquafaba is the star—always use freshly strained from high-quality canned chickpeas (like Low Sodium Chickpeas from Trader Joe's), as the salt content affects stability. For the cocoa powder, Dutch-processed brands like Ghirardelli or Valrhona dissolve smoothly without bitterness. The chocolate chips should be 70% cocoa or higher for that rich, velvety texture—avoid the sugary ones. If you're using store-bought aquafaba, check the label for additives; nothing but chickpea brine ensures perfect whipping. The vanilla extract matters too—Madagascar bourbon has deeper flavor than imitation extracts.
No aquafaba? Silken tofu blended with 1 tbsp lemon juice works in a pinch, though texture differs slightly. Substitute cocoa powder with carob powder for a milder flavor, but reduce by 1 tbsp. The baking soda is non-negotiable—it's what creates that tender yet sturdy crumb. For the chocolate chips, melted dark chocolate (70%+) can replace them entirely—just chill until firm before folding. The plant-based milk can be swapped for coconut milk for extra richness, though it may alter the crumb slightly. Always sift the flour to avoid dense layers—King Arthur or Bob's Red Mill brands work best for this.
Store the cake in an airtight container at room temperature for up to 3 days, or refrigerate for 5 days to maintain moisture. For longer storage, freeze individual slices wrapped in plastic for up to 3 months—thaw at room temperature before serving. The cake reheats beautifully in the microwave for 10-15 seconds to revive its softness. Freshly baked, it's best enjoyed within 24 hours when the layers are at their peak fluffiness. Dust with powdered sugar or drizzle with melted chocolate just before serving for that restaurant-quality finish.
Why You'll Love This Recipe
- Here’s what sold me: that deep, velvety chocolate flavor from the cocoa powder and sugar, but with none of the heaviness of butter or oil. The aquafaba gives it a light, almost airy texture, so it’s indulgent but still feels lighter than your average cake. (Yes, even on a Tuesday night.)
- No-Fuss Mixing: I swear by this recipe because it’s basically a one-bowl wonder. Just whisk the aquafaba until frothy, fold in the sugar and cocoa, then add the dry stuff—no eggs, no butter, no fuss. The only measuring you’ll do is the flour and baking soda, and honestly? That’s the easy part.
- Rich Without Guilt: Here’s what sold me: that deep, velvety chocolate flavor from the cocoa powder and sugar, but with none of the heaviness of butter or oil. The aquafaba gives it a light, almost airy texture, so it’s indulgent but still feels lighter than your average cake. (Yes, even on a Tuesday night.)
- Budget-Friendly Luxury: Between us, this cake costs a fraction of what store-bought versions do, and it’s way better. The aquafaba is free if you’ve got canned chickpeas, and the rest of the ingredients are pantry staples. I’ve made this for birthdays, potlucks, and even just because—no one ever guesses it’s vegan.
Step-by-step instructions for aquafaba chocolate cake
Master this vegan technique to create layers that rival traditional cakes—light, airy, and richly chocolatey.
🍳 Step 1: Whip the Aquafaba to Stiff Peaks
Pour the 1 cup aquafaba (chickpea brine) into a heatproof bowl and place it over a pot of simmering water (double boiler). Heat gently until the temperature reaches 160°F—this stabilizes the proteins for better volume. Remove from heat and let cool to room temperature before whipping.
Using a stand mixer fitted with the whisk attachment, beat the aquafaba on high speed for 10-12 minutes until stiff, glossy peaks form. You should be able to lift the whisk and have the meringue hold its shape. Here's the thing—if you rush this step, your cake will be dense. I've found that adding 0.5 teaspoon distilled white vinegar at the 8-minute mark helps stabilize the meringue further, preventing deflation during baking.
👨🍳 Step 2: Combine Wet Ingredients for the Cake Batter
In a separate large bowl, whisk together the 1.5 cups granulated sugar, 0.5 cup vegetable oil, and 0.5 cup plant-based milk until fully combined. This mixture should be smooth with no graininess. Next, sift in the 1.5 cups all-purpose flour, 0.75 cup unsweetened cocoa powder, 0.5 teaspoon baking soda, and 0.25 teaspoon salt. Gently fold these dry ingredients into the wet mixture using a spatula, being careful not to overmix—just until no flour streaks remain.
Add the 1 tablespoon vanilla extract and 1 tablespoon cornstarch (this prevents a gummy texture) to the batter. Here's where it gets interesting: fold in half of the 1.5 cups dark chocolate chips (reserve the rest for later). The batter will be thick but pourable—this is normal. If you're worried about the aquafaba deflating when combined, don't be. The structure we built in Step 1 will hold.
🥘 Step 3: Fold in the Aquafaba Meringue
Gently fold one-third of the whipped aquafaba into the cake batter using a spatula, cutting through the center to maintain air incorporation. Once fully combined, add another third and fold gently. Finish by folding in the remaining aquafaba until no streaks remain. The batter will be thick and glossy—almost like a brownie batter with air pockets. This is the moment that matters: if you deflate the meringue by overmixing, your cake will sink. Work quickly but deliberately.
Divide the batter evenly between two 8-inch round cake pans lined with parchment paper. Sprinkle the remaining 0.75 cups dark chocolate chips evenly over each layer. The chips will melt slightly during baking, creating pockets of molten chocolate throughout.
🔥 Step 4: Bake at Low Temperature for Even Rising
Preheat your oven to 350°F and place the cake pans on the middle rack. Bake for 30-35 minutes, or until a toothpick inserted into the center comes out clean. Here's the key to success: the aquafaba cake rises slowly, so don't open the oven door early. The edges should be set but the center should still look slightly underdone—it firms up as it cools. If the top browns too quickly, tent loosely with foil after 20 minutes to prevent over-browning.
Real talk: your oven might run hot, so start checking at the 25-minute mark. The cake is done when it springs back slightly when pressed gently in the center. Let the cakes cool in the pans for 10 minutes before transferring to a wire rack to cool completely.
🍽️ Step 5: Assemble and Frost for Maximum Richness
Once completely cooled, level the tops of the cakes if needed. For the frosting, beat the remaining whipped aquafaba (if any leftover) with 2 tablespoons vegetable oil and 1 tablespoon cocoa powder until smooth. Spread a thin layer on one cake layer, then place the second layer on top. Frost the entire cake with the remaining mixture, creating a smooth finish. Here's the thing—this frosting is delicate, so work quickly to avoid melting.
Chill the cake in the refrigerator for at least 2 hours before slicing. This ensures clean cuts and prevents crumbling. Serve at room temperature for the best texture—each slice should be moist, tender, and packed with chocolate flavor. The aquafaba technique delivers a cake that's surprisingly light for being vegan, with layers that hold together beautifully.
Pro Tips For Making Aquafaba Chocolate Cake
- Whisk Aquafaba Until Stiff: I learned this the hard way—skipping the whisking step means your cake will sink like a rock. Use a hand mixer or stand mixer to whip the aquafaba with sugar until it forms soft peaks (about 5-7 minutes). This mimics egg whites and gives the cake its structure.
- Sift the Cocoa Powder: Lumpy cocoa powder is the enemy of smooth batter. Sift it directly into your dry ingredients to avoid clumps, which can make your cake dense. Trust me, your fork will thank you when you cut into it later.
- Don’t Overmix the Batter: Once you fold in the dry ingredients, stop mixing as soon as they’re just combined. Overmixing develops gluten in the flour, turning your cake into a chewy brick instead of a light, airy treat. A spatula and gentle folds are your friends here.
- Use a Toothpick Test: The cake’s done when the center springs back when pressed—not when it looks set. Ovens vary, so resist the urge to pull it early. A toothpick with a few moist crumbs is perfect; dry means it’s overdone and will taste tough.
Perfect pairings for this recipe
Frosting Alternatives
Skip the aquafaba frosting for a vegan chocolate ganache—melt 1 cup dark chocolate chips with ½ cup coconut cream and 1 tbsp coconut oil until smooth. Let it cool slightly before spreading. This adds ultra-rich decadence without extra effort. 🍫
Fruit Toppers
Fresh berries brighten the chocolate's depth. Try raspberries or blackberries arranged in a circular pattern on top—their tartness cuts through the sweetness beautifully. For a tropical twist, use mango slices or passion fruit pulp as a vibrant garnish.
Coffee Infusion
Add 1 tbsp instant espresso powder to the batter for a mocha twist. The coffee enhances the chocolate flavor and pairs perfectly with a dusting of powdered sugar or a drizzle of chocolate syrup. This variation feels like a gourmet dessert without extra work.
Nutty Crunch Layer
Press ½ cup chopped walnuts or pecans into the bottom of your cake pans before adding batter. The nuts toast slightly during baking, adding texture contrast. For extra flair, sprinkle toasted coconut flakes on top before baking.
Spiced Orange Zest
Zest 1 orange and fold it into the batter for a bright citrus note. The orange's acidity balances the richness, making each bite feel fresh. Pair with a vanilla bean glaze**—mix ½ cup powdered sugar with 1 tbsp vanilla extract and 1 tbsp almond milk for a glossy finish.
Nutrition facts
Frequently asked questions
Can I substitute aquafaba with another egg replacement?
While aquafaba creates the best texture for this recipe, you can use 1/4 cup ground flaxseed mixed with 3/4 cup water as a substitute. However, the cake won't be as light or airy—it'll be denser. For meringue-like texture, 1/2 cup silken tofu blended with 1 tbsp lemon juice works better, though results vary. Aquafaba's unique protein structure is what gives this cake its signature fluffiness.
Why did my aquafaba not whip to stiff peaks?
This usually happens if the aquafaba was too cold or had too much salt. Always use freshly strained aquafaba from high-quality chickpeas (low-sodium works best). Heat it gently to 160°F first to stabilize proteins, then let it cool to room temperature before whipping. If it still doesn't peak, try adding 1/2 tsp cream of tartar or white vinegar to help stabilize the foam.
Can I make this cake in a single layer instead of two?
Yes! Use a 9-inch round pan and reduce baking time to 25-30 minutes. The cake will be slightly thicker but just as moist. For extra richness, add an extra 1/2 cup chocolate chips to the batter. Just remember: single layers are best for smaller gatherings or when you want a more rustic presentation.
How do I store leftovers without drying them out?
Wrap individual slices tightly in plastic wrap and store in an airtight container at room temperature for 2-3 days. For longer storage, freeze slices for up to 3 months. To refresh stale cake, warm slices in the microwave for 10-15 seconds or at 300°F for 5 minutes. The aquafaba keeps the moisture locked in better than traditional cakes.
Is this cake gluten-free?
Not as written, but you can easily adapt it! Replace the all-purpose flour with a 1:1 gluten-free baking flour blend (like Bob's Red Mill). Add 1/2 tsp xanthan gum if your blend doesn't contain it. The texture will be slightly denser, but still delicious. For best results, let the batter rest for 10 minutes before baking to help the gluten-free flour hydrate properly.